![]()
In this article we introduce you to GParted, a powerful and complete tool that will help you get your hard drive ready. For this you must know what it is, what it is for and its basic operation, which is what we will try to teach you in this post, so that you can start taking your first steps with it in a simpler way. Of course, be careful since damaging a partition or deleting it can lead to the loss of your data, so be careful if you are not an expert.
Many of you will already know it, many others will have already used it on numerous occasions, but for the less expert or for those who still do not know this partition editing tool Open source under the GPL license and written in C ++, To say that it is not only useful for Linux, since there is a Live version to run from a disk or USB memory, being able to manage other partitions of other operating systems as long as they are supported.
In the beginning it was and is the partition editor of the GNOME desktop environment, although there are alternatives like KDE Partition Manager for the alternative desktop to GNOME and many other tools, but perhaps GParted is the one that has become the most famous and therefore the most interesting to talk about here. But before we start with the GParted tutorial, let's see a little theory to put you in place and find out what it is for.
What is GParted for?
GParted is, as I said, a partition editor, that is, a software that serves as a utility to create, view, modify or erase partitions on a hard drive, pen drives, memory cards, etc. These storage systems need some type of editor such as GParted to form a partition and a format to be used by operating systems or even isolate data or operating systems in different sectors within the same hard disk.
What is a partition?
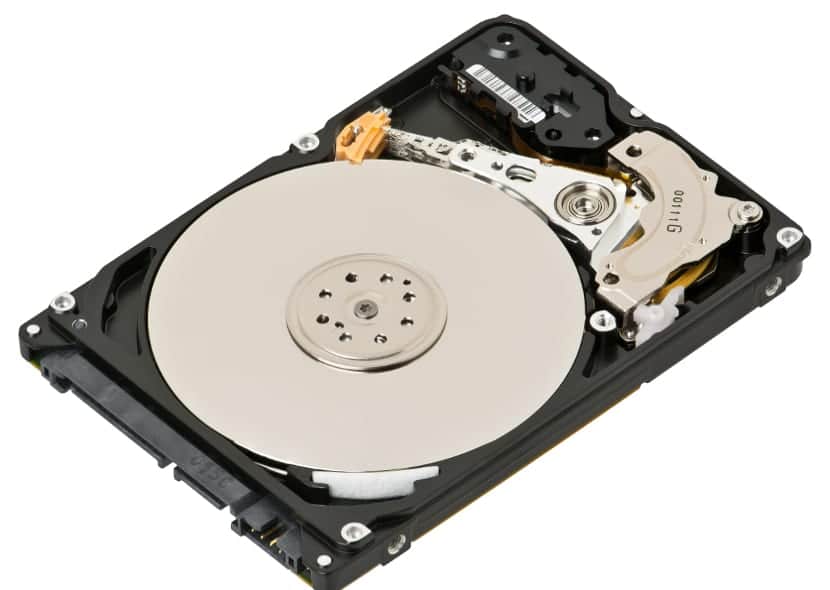
A disk partition is a partition This can be done on a physical storage unit (USB memory, hard disk, memory card, DVD,…). Although the generic definition emphasizes that it is a division that can be done in a single physical storage unit, this is not entirely true, since in GNU / Linux and in UX, there is a tool we already talked about to extend this ability beyond normal limits and provide greater flexibility.
But this does not interest us right now, only to know what a partition is and how important it is in computer systems. You should also know that every partition must have a format, a file system so that any operating system can interpret it. In this sense, not all systems can be supported by all OS, for example Linux is one of the most supported. Windows for example can use FAT, FAT32 and NTFS, Mac OS X also has theirs like HFS and HFS +, etc.
And sfile system or FS (FileSystem) It is basically responsible within these partitions for adding the functions of assigning space to the data, managing free space, the type of access to the safeguard, etc. That is, they structure the stored information to be able to be represented by the software ...
This is what we mean when we say "let's format ...", to give you one of these formats to a memory, although we also create one or more of these partitions. What use would a storage unit be without partition / es and format?
GParted tutorial
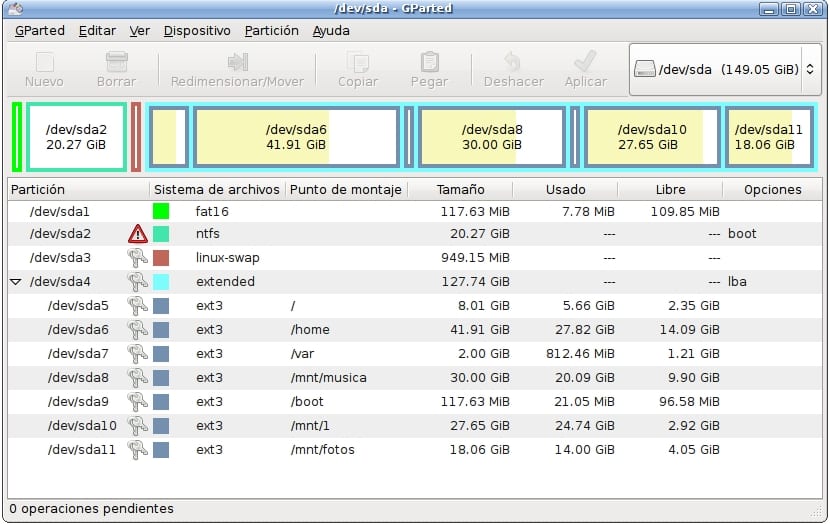
This image shown on these lines is the GParted GUI, a tool that allows you to work graphically for those who have such a phobia of the command line or the less expert. Therefore, a simple-to-use and intuitive interface is presented that we can use to manage our partitions and give formats, not only installing it in our distro, but also with the Live that you can download from the web to start it from the RAM memory and without install….
Download GParted and installation
Well, the first thing to have GParted is to install it in our distribution or use it in Live mode and for this we need first download the latest version of GParted:
- GParted official download website where you will find the version for different distros such as Debian, Fedora, Ubuntu, openSUSE, although it also specifies the command that you must use in the terminal to install it instead of downloading it from the web. On this website you will also find the source code and the Live version of GParted in three different versions, for i686 (32-bit) systems, i686-PAE (with Physical Address Extension in 32-bit systems) and amd64 (for 64- bit). In the event that you have chosen Live, then you will have to transfer it to a USB or CD to be able to boot it.
If you want to do it directly from the consoleTo install GParted on your distro without downloading, you must type the following:
- For Debian, Ubuntu and derivatives:
sudo apt-get install gparted
- For openSUSE:
sudo zypper install gparted
- For Fedora:
su -c "yum install gparted"
If you opt for LiveOnce you have downloaded the ISO, which by the way, you will have to use Legacy mode in modern systems with UEFI (equipment purchased from 2010 approx.), the next step is to burn it on an optical disc or a pendrive. How to do it? Well, in order not to be redundant, you can obtain information from another of our articles here. In it I explained how to burn the ISO on a pendrive to be able to boot it from a UEFI system, only that instead of being the one from Ubuntu it will be the one from GParted ... In case you want to burn it to a CD / DVD / BD, do it with your tool. preferred recording (Brasero, k3b,…).
By the way, if you manage to start Live, you will find a menu in which you must select the following options:
- GParted Live (default option)
- Select Keymap from arch list (to select the language of your keyboard, in this case ES)
- Select 0 to start in graphic mode and the same window will appear as if you had installed it on your distro, so you can continue with the tutorial regardless of the option chosen, Live or installation ...
First Steps
Now we have GParted running in our system, either by running it from RAM in Live mode or by opening the program from our distro. One thing that I have not said before but that is obvious, is that you will not be able to work with all the partitions from the application, but from Live. This is normal, since when it is running from RAM, you have all the partitions free to manipulate them, on the other hand, from the application you will be "stepping on" a partition that is being used by the operating system at that moment ...
Having said that, we begin with the actual operation of GParted. In the interface we see the menu at the top, toolbar with quick buttons and a partition or storage device selector, just below there will be a bar divided or not in colored boxes that are the partitions in the chosen storage unit and on the back we will see a breakdown with some details of said partitions or unformatted spaces ... You will also be able to see the pending operations that GParted will perform right at the bottom edge of the window and that will be applied just when you click the "Apply" button once you have it clear.
Well, to act with GParted is very simple:
- Select the unit in the selector where you want to work (hard drive, USB stick, memory card, etc). It should appear in the drop-down selector menu, if it is connected to the computer.
- Now the partitions will be displayed, if any, from that storage unit. If there are no partitions, the space still empty will be shown for formatting and use. Whether it is a partition or empty space, if you select it with the mouse you will see that some buttons that were inactive on the toolbar become accessible to work with the selected space.
- You can also use the right mouse button on the slice or space on which you want to work and a menu with options will be displayed. You can see that details of each partition are shown, if it has a key icon it is that it is locked or in use and you cannot work with it. You will also see an arrow that when you click on it, it will show subdivisions of a partition if there are any, as well as the anchor point, file system used, size, etc.
- Now we may have selected a partition or a raw space. In any case the options that we are allowed are:
- New: It is used to create a new partition in unallocated or raw space. It is for when you have bought a new storage unit and it comes unformatted, to be able to give you one and that the system recognizes it to be able to work with it. You can create a single partition on a storage unit or several, depending on your needs.
- Eliminate: removes a created partition, ideal for when you want to free up that portion of the disk to join this raw space to another existing partition for expansion or simply to reformat it.
- Copy / Paste a partition: as its name suggests it allows you to copy and paste a partition in a given location. This will make the pasted partition have the same UUID, format and label as the copied one, which could generate a conflict, therefore, if you are not an expert, be careful.
- Resize / move: It is used to move partitions from one place on the hard disk to another (interesting in case of damage to a sector of the hard disk or memory to move the partition to another good sector) or resize them. For example, if we want to expand or reduce the size of a partition because it has become too small or simply to free up some space by reducing it and then adding it to another.
- Format like: format the storage unit or partition to give it a filesystem or FS from among those supported by GParted. GParted supports file systems or formats such as ext2, ext3, ext4, SWAP, FAT16, FAT32, etc. If the partition in question is going to be used as a swap space, you can choose SWAP. If it is destined for other uses on GNU / Linux systems, I recommend ext in its most modern version, ext4. But if what you need is a drive compatible with other operating systems to be shared, or even to be read / written by other devices such as a TV, printers, etc., then you must use FAT32.
- Disassemble / Assemble: unmount / mount the / dev / xxx device from its mount point to be able to work with it if it doesn't let you or simply to unmount it if necessary. In addition, once done, it refreshes the distribution to show the updated content on the screen.
- Check: it checks the partition, it will find and try to repair problems that it finds in a partition if it is damaged or corrupted.
- UUID: Allows you to change the Universal Unique Identifier of the device in question. This is best left untouched if we don't have a lot of experience.
- TAG: names or labels the volume.
- Information: displays detailed partition or volume information.
- Once we have selected the work we want to do, it will be enough to give the icon that is like a green tick or V In the toolbox and GParted you will be able to work to do what you need ... Wait for it to finish and be careful that the computer does not turn off or the battery runs out in the middle of a process or the partitions may be damaged and lose data. So if you use a laptop, always have it connected to the network during the process.
Do not forget to leave your comments with doubts, suggestions or criticisms, if you have them. I will try to answer them all ...
A genius this article, I will have it at hand ...
I love them when they publish these tutorials .. Thank you very much.
Excellent
Good tuto. For me it is simply an essential tool for daily use for my work.
Thank you all!!!
Hello. Thanks, but I have a problem.
It turns out that GParted does not give me the mount point option, that column is not there, so I have not been able to install my Linux. Thanks for your help.
The mount point column does not appear !!!!
Somebody get me out of that trouble, please
Good tutorial. In a part of the post you ask, What use would a storage unit be without partition / s and format?
I can think of several answers, for example:
1. I usually do a complete erasure of the hard drive of my PS4 and curiously with another tool, since gparted does not allow to perform this task "that I know of" ... Fill the hard drive with zeros, either fast or slow.
The idea of not wanting to give it a type of format and / or create partitions is because in the case of Sony video consoles, PS3 and PS4 they take care of giving their own format to the internal hard drive. For this reason, why are we going to give a FAT format to the internal hard drive if the PS4 is going to give it its own format ... which by the way, nobody knows what type of format it uses.
That would really be the correct way to do it and that is 1 of the reasons why such options exist in gparted.
Now I am starting to mount a file server with UBUNTU SERVER 15, surely it will be very useful to me, and as soon as I can apply it I will comment on how it went… .thank you
Hello. Is there a way that GParted can move the contents of a Primary partition to a Logic within Extended?
Thank you very much for the tutorial. It has been very useful.
What do I do if I only have one partition and it won't let me do anything?
Thanks, concise and to the point, as it should be!
Thanks for the contribution, excellent. Working wonderfully a Greeting
You should put your full name I have made bibliographic references of your page but I can not put your name.