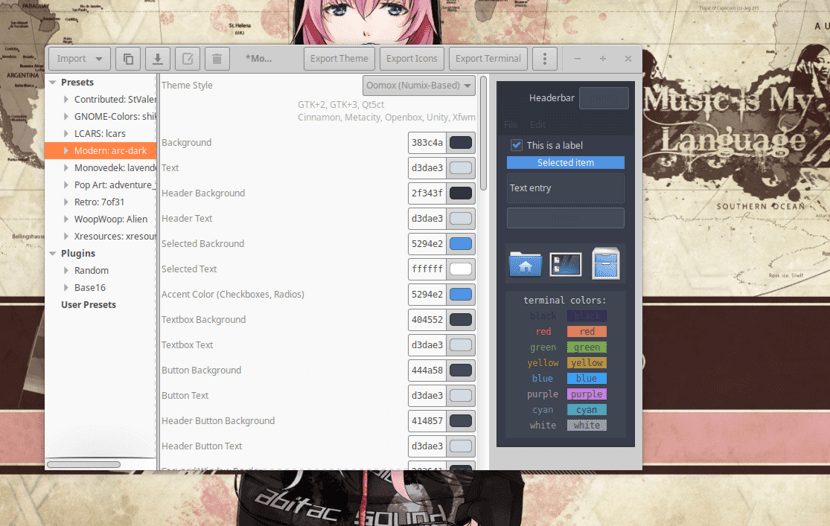
Oomox is a GUI tool with which you can generate various color variations of themes Numix (GTK2 / GTK3), as well as Gnome-Colors and Archdroid icon themes.
Se ships with support for GNOME, Unity, Xfce4, and Openbox desktop environments and a host of built-in presets that can be further customized. It's pretty much the easiest way to create your own GTK theme.
The has its interface basically divided into four elements, a top bar with buttons responsible for actions such as: "Import color schemes", "Clone theme", "Save theme", "Rename theme", "Delete theme", "Export theme", "export icons" " Export color to the terminal of a hamburger menu with all the program shortcuts'.
The main part of the application is divided into three on the left are the "Presets" and "plugins"With variations of themes offered in advance by the program, and will also become custom themes and created by the user.
In the center are correctly all customization options for the themes, such as »theme style» which allows you to customize and create themes based on the time of three popular themes in the community, which are: Numix ”,“ Material ”and“ Arc ”.
In addition to the colors of the themes and their elements, there is the possibility of creating some icon themes with color variations, such as color schemes for the terminal.
The last part of the software on the right is the preview of the changes in real time, very useful and avoid manual application.
How to install Oomox on Linux?
To install this tool on our system, we must follow the instructions that we share below.
If they are Debian, Ubuntu, Linux Mint users or any other derivative of these. We are going to download the deb package for our system.
We are going to open a terminal and in it we will type the following command:
wget https://github.com/themix-project/oomox/releases/download/1.11/oomox_1.11-3-gde075379_18.10+.deb -O oomox.deb
Once the deb package has been downloaded, we can install it on our system with our preferred package manager or from the terminal executing the following command:
sudo dpkg -i oomox.deb
And we are going to resolve the application dependencies by executing the following command:
sudo apt install -f
For those who are users of Arch Linux, Manajaro, Antergos or any other distribution based on Arch Linux. They are going to install this application from the AUR repositories. So they must have an AUR wizard installed on their system.
You can consult the following publication where I recommend some. The link is this. The installation is going to be done by opening a terminal and executing the following command:
yay -S oomox-git
And with this they will be able to run the application on their system. In case of not finding the application launcher, it can be opened with the following command:
oomox-gui
In the case of those who use Fedora, CentOS, RHEL or any other distribution derived from these, we will have to enable the following repository with this command:
sudo dnf copr enable tcg/themes
And we are going to install the tool with:
sudo dnf install oomox
Finally, for those who are users of any version of openSUSE, they will perform the installation by executing the following command:
sudo zypper in oomox
Customizing themes with Oomox
We are going to open the tool and by doing this it will scan all the currently installed themes For best results, be sure to install the Numix and Materia themes before doing anything.
To create your theme, in the left sidebar of Oomox find a predefined theme and click on it to open the settings for it.
There are many different settings to modify in the theme creation area. Let's start by changing the "theme style".
Find the drop-down menu next to "theme style" and click on it. After switching to a new style, they must go down the list and modify the various color settings. These color settings are at the core of the theme and will determine how it will look on your desktop.