![]()
How many of you don't have resorted to various programs to be able to convert some of your video files to another format for compatibility with a device or simply to gain more space by reducing its weight.
For my part I have used different programs and have obtained different results, in most of them we are very limited to the options they offer us, from only being able to convert to certain formats, only to the same or some others with many options that you have no idea what each of them does.
This time I take this opportunity to share with you a great tool that is very powerful given all the features and options it offers us and is easy to use.
This tool is called FFmpeg As I mentioned, it is quite simple to use and is aimed at both people with advanced knowledge and novice users.
ffmpeg allows us to record, convert and stream audio and video, This program is free software, it was originally developed for the GNU / Linux environments, but given its great popularity it can also be compiled on most operating systems, including Windows.
We can also highlight that this program, most of its developers are also from the MPlayer project.
Lastly, I must mention that FFmpeg is a command line tool For this reason, it does not use any graphical interface, although there is WinFF which is a GUI of this, personally I can say that it is preferable to learn the use of FFmpeg, since many video converters use it as a base and several of them support the entry of custom commands for this tool.
Before going on to explain a little about your options, I will share with you in the following link, where you can review the audio, video and image formats that can work with this tool, as well as the options and codecs.
How to install FFmpeg on Linux?
Today most Linux distributions have this tool already installed by default, although there are few that exclude it for themes of some libraries that are not open source. Without further ado I leave the commands for its installation.
For Debian, Ubuntu and derivatives:
sudo apt-get install ffmpeg
For ArchLinux, Manjaro and derivatives:
sudo pacman -S ffmpeg
For Fedora, Red Hat, CentOS, openSUSE, and derivatives:
sudo dnf install ffmpeg
How to use FFmpeg?
The first step is define to what type of format we are going to convert our video, as well as the audio format, if we want the video to have a particular resolution, if we want a particular size for the resulting video, audio bitrate, video bitrate, fps, etc.
Now to start using the program, we must open a terminal, we will start with getting information from the video with which we are going to work, for this we use the following command:
ffmpeg -i ~/Videos/video.mp4
We can indicate the path of the video or simply position ourselves in the terminal over the folder where our video is, in my case it will show me something like this:
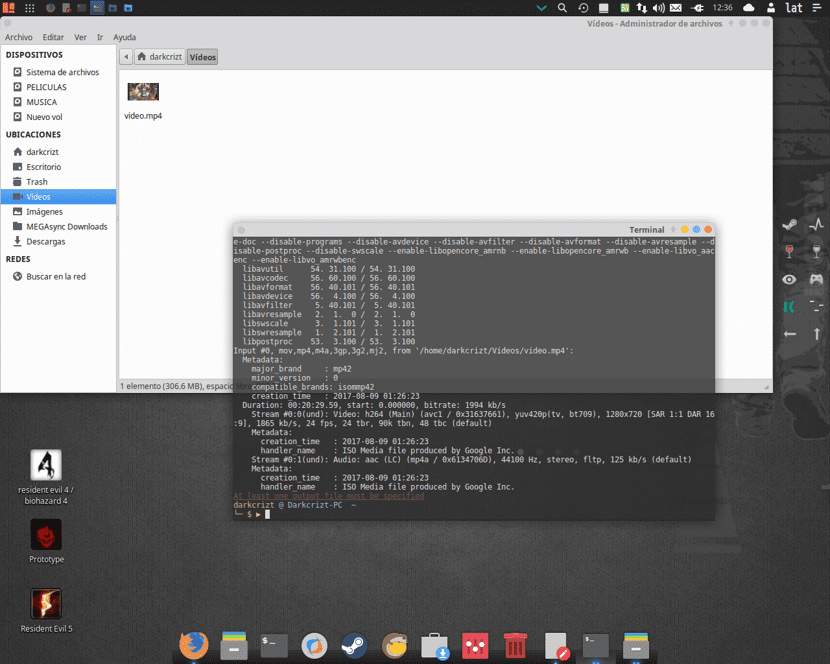
With this information we can take a range of values with which we can create our new video, if you want to increase the resolution, fps, audio and others, you can do it, but the result will be bad.
In my case I am interested in converting the video so that I can use it on my multimedia server and can play it directly on Chromecast (since it does not support transconditioning). In your case, you should look a bit about the recommended formats, as well as the values for a particular device.
The other case if you have no interest in something in particular and just convert it the commands are as follows.
Convert from one format to another and let ffpmeg take care of the convenient values:
ffmpeg -i videoaconvertir videoresultante
There is something like this, for example, from mp4 to avi or flv to mpeg or mkv to avi etc.
ffmpeg -i video.mp4 nuevovideo.avi
ffmpeg -i video.flv nuevovideo.mpeg
ffmpeg -i video.mkv nuevovideo.avi
Now I will leave you some parameters and what they do:
-qscale 0: Keep the same resolution
To change the video resolution, in this case to 1280 × 720
m-filter: v scale = 1280: 720 -c: a copy
-s 1280 × 720 -c: a copy
-aspect 16: 9: If you want to change the aspect ratio, in this case 16: 9
-b: v 2600k: Bitrate of the video in this case at 2600
-b: at 128k: Bitrate of the audio here in this case 128
-pass 1: In how many passes will the video conversion finish (the recommended is 2)
-c: a aac: Codec of the audio in this case aac
-c: v libx264: Codec of the video in this case h.264
-framerate 30: How many FPS will the video have in this case 30
-threads 2: This option in case of having a processor with 2 or more cores, we can indicate that more than 1 are used for the video conversion and thus speed up the process.
There are many I recommend you read this other Wiki where he explains in more detail the use for each particular case.
Now in my case, as I mentioned, I am interested in my Chromecast, for this I must place it like this:
ffmpeg -i video.mp4 -pass 2 -b:a 128k -c:a aac -c:v libx264 -qscale 0 -framerate 29 -threads 2 nuevovideo.mp4
Without further ado, I can only say that it is a simple tool, but quite powerful if one delves into the subject and about all the options that FFmpeg offers us.
Good tutorial
Fabulous. Very useful. I needed it.
Okay!!! Thanks a lot
Very good tutor.
And if you want Windows:
1.- Downloads on github: https://github.com/BtbN/FFmpeg-Builds/releases
unzip in a zip if you want GPL or LGPL etc.
2.- copy from the downloads folder to C: \, change the long name to a short one for "C: \ FFMPEG-XX", where XX is the version
3.- Press Windows + Pause, then on "Advanced system settings", then on "Environment variables", then first "user variables for XXXX" look at "PATH" and click on "PATH" and add at the end like: "; C: \ FFMPEG-XX \ bin; C: \ FFMPEG-XX \ lib", then "OK" or "ACCEPT" and then "system variables" and click on "PATH" and add to the end as: «; C: \ FFMPEG-XX \ bin; C: \ FFMPEG-XX \ lib», then click on «OK» or «OK and then once finished, click on OK and then accept. Do not restart the machine, you just close the console of the CMD terminal and the console of the POWERSHELL terminal, it will restart the consoles by itself without requiring to REBOOT the machine.
Final final steps….
then use the parameters that come out in linux identified above.
Luck!!!
If you want in a 1280 × 727 (720p) I leave the commands for Windows CMD or POWERSHELL:
ffmpeg.exe -ic: \ my_folder \ video.mpg -b: a 128k -s 1280 × 720 -aspect 16: 9 -c: a aac -c: v libx264 -framerate 29 c: \ my_folder \ newvideo.mp4
or the mysterious 1280 × 727 (like the Boeing 727 !, add the 7 instead of the "0"), known as "727p" and we look like this:
ffmpeg.exe -ic: \ my_folder \ video.mpg -b: a 128k -s 1280 × 727 -aspect 16: 9 -c: a aac -c: v libx264 -framerate 29 c: \ my_folder \ newvideo.mp4