
All desktops include a screen capture tool that can be started by pressing the PrintScreen key.
One of the things we Linux users do is share photos of our desktops on social networks. Some customizations are true works of art and, although there is no declared competition, there is no doubt that there is. Whether you want to join or because you are interested in making tutorials or need help from the forums, knowing how to take screenshots in Linux is a skill you should learn.
There are also other uses. For many visually impaired, the accessibility options of e-book readers are not enough, and since they are protected by DRM, format modifications cannot be made, the alternative is to take screenshots of the pages and pass them through an optical recognition program. of characters. We will also see how to automate that process.
How to take screenshots
So that you understand what this post is about, start by defining the screenshot as a photo or video showing what you see on the monitor. The capture can be of the entire screen, part of it, or a window.
I talked about video screenshots in a previous article, so I am going to concentrate on the tools for capturing images.
The easiest way to take a screenshot is to press the key Print Screen on the keyboard. On most Linux distributions this should open the corresponding application where you can select different options.
Each app has its own screenshots to speed up the process.
Tools to take screenshots
Show
It is the tool that is included in the KDE desktop and it is the one that opens when you press the PrintScreen key. We have the following capture options:
- Fullscreen.
- rectangle region.
- Active window.
- Window under the cursor.
The difference between the last two options is that the active window is the one in the foreground, while with the last option you can select any other open window with the mouse pointer.
Spectacle allows us to establish a delay from the moment we press the key Print Screen or the button Take a new capture or take it immediately.
The capture may include:
- Include the pointer
- Include the title bar and the window border.
- Capture a popup.
Screenshots can be saved in most common graphic file formats, copied to the clipboard or exported to the graphics editing or viewing programs that we have installed on the computer.
The annotation tool provides us with a small graphical editor that allows us to mark areas of the screen, add text and emoticons, blur part of the capture, highlight, add arrows and draw.
In the tools section, in addition to the option to print the screenshot, it offers us the possibility of recording the screen on video, but what it does is refer the task to another application (if it is installed) or offer us the installation.

Spectacle's annotation feature allows us to add graphic and text information to the screenshot
GNOME Screenshot Tool
Until now, GNOME's screenshot tool was not much different from KDE's except that it lacked the options for annotating and exporting to other programs. From version 42 (What we will see in the distributions released from April) there is a new tool that takes advantage of the new graphic possibilities of the desktop and merges the current image and video screen capture applications into one.
Beyond the spectacular interface, it doesn't have many features. It allows you to record all or part of a screen or a window in video or capture it in image, butor there is no option to modify the save options.
flameshot
If you are going to make a lot of modifications to the screenshot and you don't want to switch between applications, you should definitely try Flameshot. It is available in the repositories of some of the major Linux distributions, as well as in Flatpak and Snap.
When we install the program we see a small warning that informs us of the appearance of an icon in the top bar. We can launch the program by clicking on it.
When we do, we see a list of keyboard shortcuts above the active window that is darkened. When we select a region with the cursor it appears with the normal colors and a series of tools are shown on the border. With them we can:
- put above of all windows the captured image.
- upload image to Imgur.
- Open with another application The capture.
- save capture in the main graphic formats.
- Copy to clipboard.
- undo or redo the last modification.
- scroll the window of selection.
- Show coordinatesCartesian s of the selection window
- Invert the colors.
- pixelate zones of the capture.
- Number different zones of the capture.
- Add text to catch.
- Highlight areas.
- draw a circle vacuum
- Draw a rectangle full
- draw the border of a rectangle.
- Add arrows.
- Draw lines.
- Draw freehand.
We cannot assign arbitrary names, but what parameters and in what order will be part of the title with which the screenshots will be saved.
Flameshot is also available for Windows and Mac from its webpage
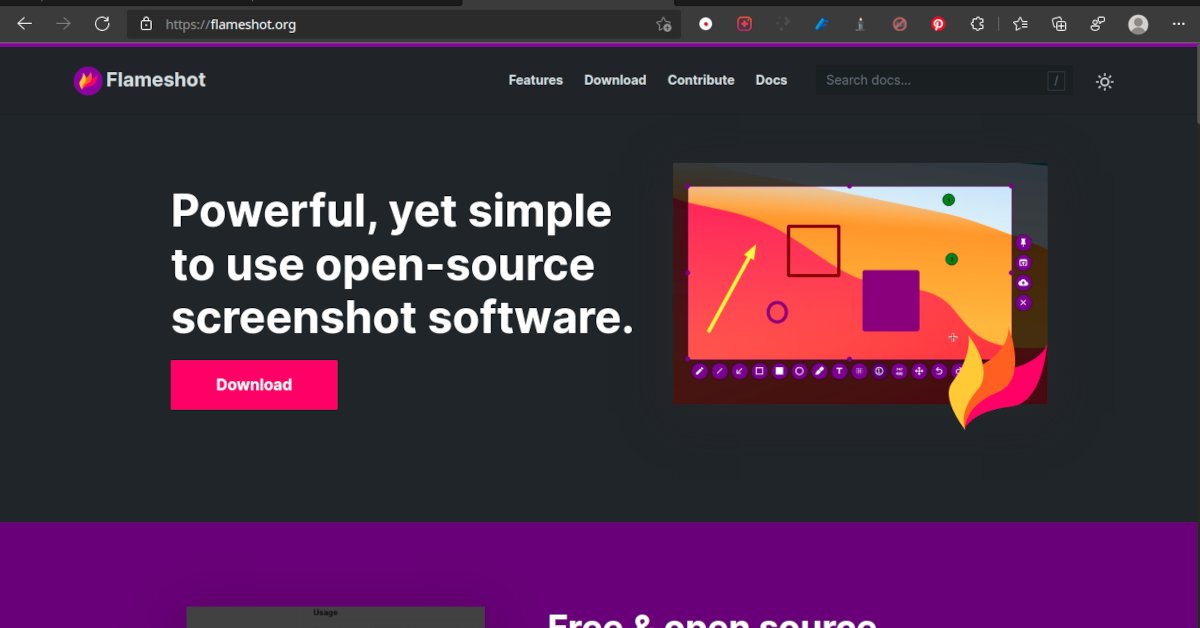
Flameshot is an open source program for taking screenshots with various editing tools.
scrot
Scrot is a tool designed to take screenshots from terminal. Its greatest utility, as we will see a little later, is that it allows you to automate the screenshot process.
It is installed as follows:
Debian, Ubuntu and derivatives
sudo apt install scrot
Fedora
sudo dnf install scrot
Take full screen capture
scrot
This will save the full screen in your personal folder and the name made up of the date and size.
Choose image destination and name
scrot ~/Imágenes/captura_scrot.png
Select window or region
If you tried the previous commands, you will have noticed the problem. The terminal always appears in the capture. This is fixed with the following command.
scrot -s
You just have to put the cursor on the window and press the left button or mark an area with the pointer and release the button.
Of course the commands can be combined
scrot ~/Imágenes/captura_scrot3.png -s
We can avoid writing all this by going directly to the directory where we want to save the image. we do it with
cd Imágenes
Set a delay time
Another way to make sure we capture what we want to capture is to set a time interval in seconds before the capture occurs. The command is as follows:
scrot -s -d 10
In this case we set a delay of 10 seconds before the capture.

Scrot is a complete screen capture tool used from the terminal
Determining the quality
The higher the quality of the image, the more it will weigh and the time it will take to load if you are going to use it on a website. We can adjust this parameter by setting a percentage.
scrot -q 70
Set the capture to 70% quality
Setting the size
The editors of Linux Adictos They establish that images must have a maximum width of 1200 pixels. This, with the usual screenshot tools, means that you have to run them through Gimp or some other web service to adjust them to size. Luckily scrot is going to save me the work. Let's see:
As the name of the screenshot tells me, my screen has a width of 1366 pixels, I need 1200. Applying a simple mathematical operation we calculate the parameter of the percentage of the size
1200*100/1366=87,8477..
Let's try
scrot -s -d 10 -t 87.85
The idea is good, but there are too many decimal places for you to get the desired result
Making multiple captures with mouse click simulation
Let's take a purely hypothetical example. An online bookstore with a geographical name does not let you see the books you bought outside of their devices or the browser. One solution is to automate the capture and page-turning process, and then run those images through an optical character recognition tool.
In addition to Scrot we are going to need another tool from the repositories called xdotools. With it we are going to simulate the pressure of the mouse button for the turning of the page.
Once the program is installed we must do the following.
- open the website of the cloud reading service.
- open the endly reduce it in size.
- Place the terminal on the left from the reader window.
- In the terminal type
xdotool getmouselocationand don't press enter - take the pointer to the page change button of the cloud reader and press enter.
- Take note of the X and Y values. what you will see in the terminal.
- Copy the following script in the text editor:
#!/bin/bash

while [ 1 ]; do

xdotool mousemove XXXX YYY click 1 &

scrot -q 100 '%Y-%m-%d-%H:%M:%S.png' -e 'mv $f ~/Imágenes/'

sleep 20

done
Remember to replace the x and y with the values you wrote down previously.
The program will take a screenshot of the page and switch to the next one after 20 seconds.
Save the file with the name script.sh. Then go to the place where you saved it, put the mouse on the file and with the right button give it execution permissions from the Properties window.
To launch the program type ./script.sh, maximize the reader window and watch out for when it reaches the end of the book because if you don't close the terminal it will continue to take screenshots.
Two final clarifications
The procedure I have just described was developed, as I said at the beginning of the article, by the visually impaired for use by the visually impaired who need more than just accessibility options available to enjoy the books they purchased. I am in no way encouraging the unauthorized distribution of content.
Scrot is a very complete tool, to understand all its possibilities use the command
man scrot
Thank you! I will try the scrot (ugly name :) ).
Well, on the keyboard of the mac that I just ubunted, the PrintScreen key doesn't work immediately (it doesn't have it, as it is now).
One question, if anyone wants to comment on this (thanks).
I just managed to fix a 2009 imac with the Pop distro, based on ubuntu. And how great to have been able to.
I miss a program like textedit from macOS. It's simple, to edit text, change fonts and colors, just to write, not to program..., and in it, enlarging the letter and making it fit everything was easy... and I can't use OpenOffice that way (that's worth a thousand other things);
Can someone recommend me programs? I've tried things like Kwriter or Sublime, etc., and they're not as simple and comfortable for the silliest tasks of writing, playing with fonts, colors, and being able to enlarge the text well, etc.
I don't know if it will be the same, but you can try nano.
Type nano in the terminal and the program should open for you. Otherwise look for it in the package manager
EXCELLENT PUBLICATION