
To be able to install an operating system on our computer's hard drive and be able to save and read data both on it and on external drives, it is necessary to carry out some preparation. In this post we will see how to make partitions in Ubuntu.
Although many drives already come with a partition configured and formatted with a file system probably won't serve our purposes to install Ubuntu, therefore, we must delete it and install what we need.
How to make partitions in Ubuntu. what you need to know
The first thing to keep in mind is that modifications cannot be made to the partition where the operating system we are using is located. The modifications must be made from another operating system if we have it installed, from an operating system that can be run from removable media or from a Linux distribution designed to make repairs.
To put it simply, any storage unit that can be written to can be arbitrarily divided into units less than or equal to the total size of the unit. Each division is called a partition and in order to receive data it must be formatted with a file system. Linux distributions can access partitions assigned to Windows, but Windows needs a special program to view the contents of partitions that use Linux-compatible file systems.
In the past you could only create a limited number of partitions, but this limitation is no longer there and it is possible to create them for specific uses such as storage of personal data.
We said that each partition is assigned a file system, this is a particular way of organizing and storing information. Partitions with different file systems can coexist on the same device.
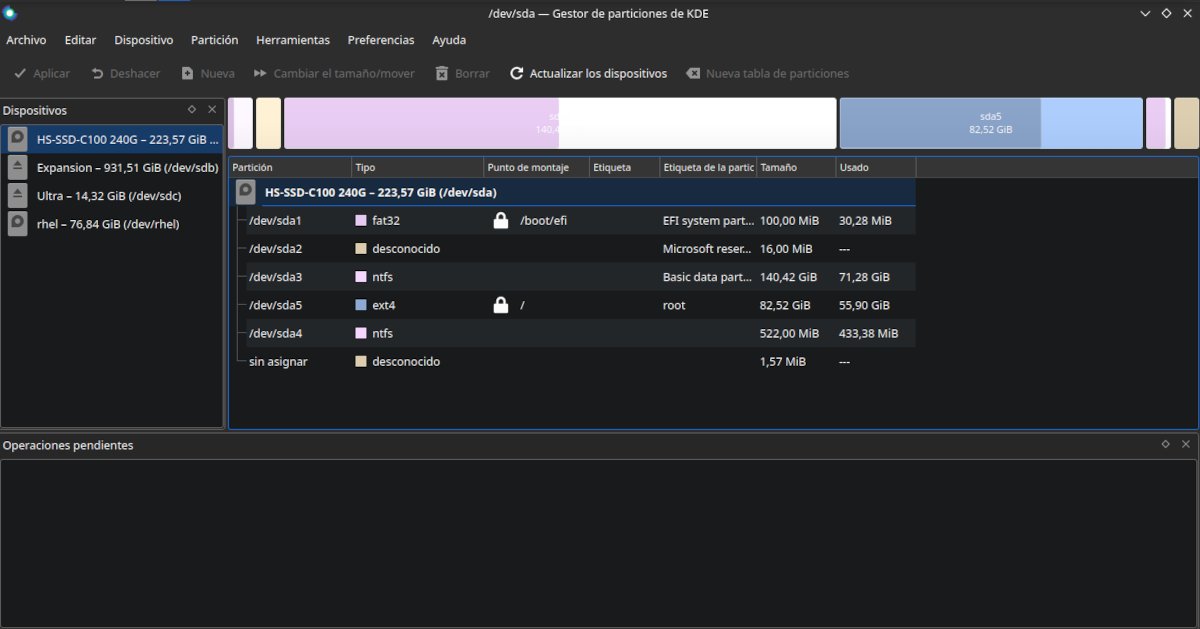
Red Hat Partition Scheme
These file systems They not only save them, they also include information about their attributes such as their name, the space they occupy and access permissions.. It also builds an index of contents and their location so that the operating system is able to find them.
In theory it is possible to change the file system of a partition without losing the data, although it is recommended to make a backup copy, format the partition with the new system and then copy it over again.
The most popular file formats are:
- FAT32: Originally used by Windows, it remains valid on portable storage devices such as flash drives and memory cards. Also, if Linux is installed on a modern computer it will automatically create or ask the user to make a small partition in this format for system use in case of manual installation.
- NTFS: It is the file system that Windows requires for its installation. It's also ideal for use on external hard drives because it can work with drives larger than FAT32 and can be read and written natively by both Windows and Linux. Macs can read content from hard drives in this format, but they require additional software to be installed to write to them.
- HFS +: It is the native file format of Macs.
- Ext2/3/4: Different generations of the native Linux file system. Ext4 is the most used, although other distributions prefer xfs or Btrfs. Both Windows and Mac require additional software to read it.
- btrfs: It is the possible successor to Ext4 as the mainstream format on Linux since it can handle much larger storage units.
- XFS: File system created in the 90s for UNIX and later ported to Linux. Its main feature is that it keeps track of changes, facilitating recovery in case of errors.
- Swaps: It's not a proper file system, but rather a place where RAM temporarily stores information that you're not using.
MBR or GUID
The MBR partition table standard could only work with devices up to 2GB and 4 primary partitions.
If you went through other tutorials, or tried to use some installation media creation tools, you may have come across concepts like extended partitions or partition style. If the drive you are going to partition will be connected to a relatively modern computer (5 years or less) you will have no problem creating more than 4 partitions, although manually installing a Linux distribution will be only slightly more complex. But, you can always let the manual installer take care of everything.
The more partitions there are on a drive and the more files those partitions contain, the more necessary a method will be that allows us to quickly find what we are looking for.
MBR and GPT are two standards for creating partition tables. that is, a list of the existing partitions on each unit including their exact physical location within the storage unit.
Remember that the division into partitions is something virtual, in the real world, the storage unit is partitioned into disks subdivided into tracks divided into sectors.
Other relevant information is whether the partition contains an operating system with a bootloader or just saves data.
GPT surpasses MBR in that it can not only handle larger storage drives, but it takes precautions to ensure data can be recovered in case it is accidentally erased or lost due to physical damage to the drive.
If you come across a drive formatted with an MBR table, you will see two types of partitions: Primary and Extended.
- The primary partition it is used to store the operating system and bootloader. It will be the one the computer goes to after completing the initial checks. There can be up to 4 but only one will be active at a time.
- The extended partition this is a software trick to get around the limit of 4 primary partitions. It is an area where we can store a third type of partition known as a logical partition.
- logical partition: It is a partition created within the extended partition area that can contain an operating system, but never be an active partition. This means that if we want to log in to an operating system hosted on one of these partitions, we must first go through the bootloader installed on one of the primary ones.
Creating partitions in Ubuntu
In Ubuntu we have several options for creating partitions, both with a graphical interface and from the command line. Some of the graphic tools are:
- The Advanced Partition Tool: It is part of the Ubuntu installer and appears when we choose to do the pre-installation partitioning manually.
- The Discs app: Ready to use and available at any time as it is installed by default.
- The Gparted partition editor: It can be installed from repositories or used as if it were a Linux distribution from a dvd or flash drive.
The Disks application does not have many options, so I recommend installing Gparted. The distributions derived from Ubuntu with the KDE desktop include their own tool that, although it has a different interface, its use is very similar to that of Gparted. You will find it by typing partitions in the search menu.
Creating partitions during the installation process.
After selecting the language, keyboard layout and installation type Ubuntu will ask if Ubuntu will share the drive with other operating systems. Then We can opt for the automated or manual process. With the automated process we will only have to use a slider to choose how much space will correspond to each operating system.
In manual mode we need to create the following partitions:
- EFI: Reserved for system use. It must be between 100 and 500 MB in size
- root partition: Of at least 20 MB it will use the Ext4 format and it will be where the operating system is installed.
- Swaps: Mandatory use on computers with less than 4 GB of RAM and optional on computers with more memory.
There is the possibility of creating a separate partition for the /Home folder, which is where data from user-installed programs, files downloaded from the Internet, and documents are stored. This is useful because you can reinstall the operating system without losing any information.
The procedure is the next:
- Click on the drive with which we are going to work.
- If this unit had partitions, we put the pointer on each one of them to select it and then on the sign button -.
- We put the pointer on the sign +
- We indicate the size of the partition expressed in MB.
- Since there is no limit to the creation of primary partitions, we leave this section as it is. Same with the location.
- In the dropdown menu for use we select EFI for the first and Ext4 for the second.
- When we create the Ext4 partition it will ask us to define a mount point. We write / to indicate that it is a root partition.
- We press the button to create the partition.
Remember that once you created the partition we must press the + sign again to create the next one. In the use dropdown menu we will find the options to make a swap partition or a separate /home partition.
Once the creation process is finished we can continue with the installation.
Gparted
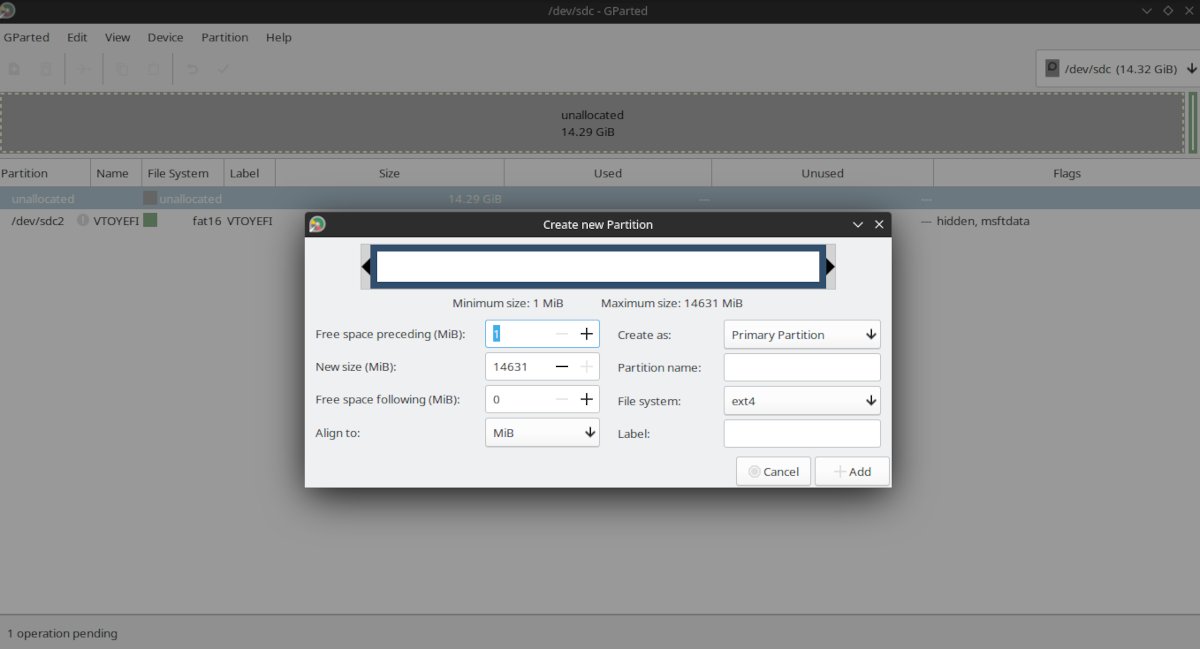
This is the Gparted partition creation wizard.
With this tool the procedure is as follows:
- We select the unit on which we are going to work in the upper right part of the menu.
- If there are partitions created, we place the mouse pointer on each one and with the right button we choose to delete or format it.
- If we want to create a new partition, we place the pointer where it indicates an empty space and with the right button we select News.
- In the window that opens we complete the measurement expressed in MiB. 1 MiB equals 1049 MB. The first Google result when you search for the equivalence is a calculator.
- Then we choose the file system. You do not need to fill in the other parameters.
- Once we finish we click on Add.
- Click on the button with the check symbol to apply all the operations.