
In recent years, and more so since 2020 in which teleworking has skyrocketed, many job offers that have to do with the network are being published. They are looking for, above all and because of the information I manage, experts in servers, Big Data or security, the latter being the ones who, in theory, would find a better job with a better salary. It is clear that a security specialist must work with his tools and will have everything ready for his auditions, but those of us who do not know that much can try other ways. For example, using Parrot 5.x where best suits us.
just a few days ago has been published Parrot 5.1, and what we are going to do in this article is explain how make your Live USB persistent. This tutorial is not about installing the operating system on a USB, but about configuring an option that has medium-native so that we can do both: start a Live USB where all the changes will be destroyed when the computer is turned off or booted into persistent mode, where the changes will be saved so, for example, that it remembers the language or the WiFi.
Parrot 5.x with persistence
The steps to follow would be these:
- We create a Live USB. The best way is with Etcher. Parrot 5.x ISOs are in your official website.
- We restart the computer and start from the USB. If it hasn't been done before, you may have to press some Fn to do it. On many computers, to get in you have to change the boot order from the computer setup, which can be accessed by pressing F2 at startup. It would be necessary to make it read the USB first or activate the option to choose boot from the beginning. In the second case, if it exists, you would have to press F12 (or something like that) at startup and choose USB from the menu that appears.
- Already within Parrot 5.1, or the version that we have that is compatible, we open GParted.
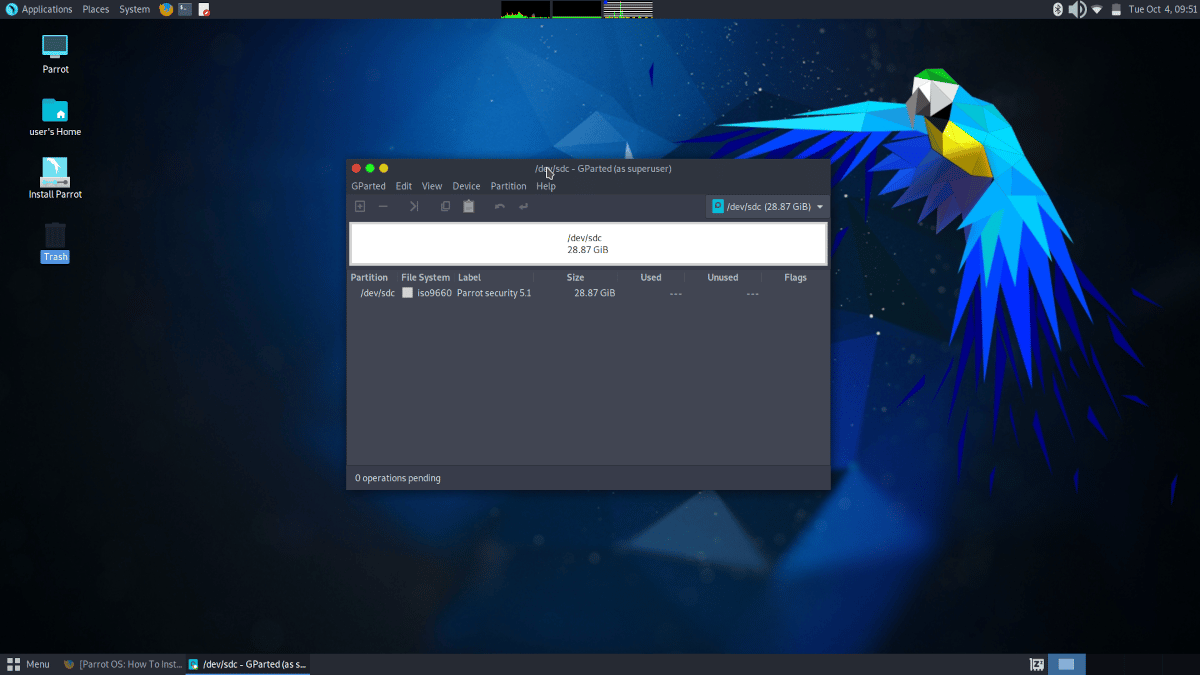
- We look at where it is mounted, in my case /dev/sdc.
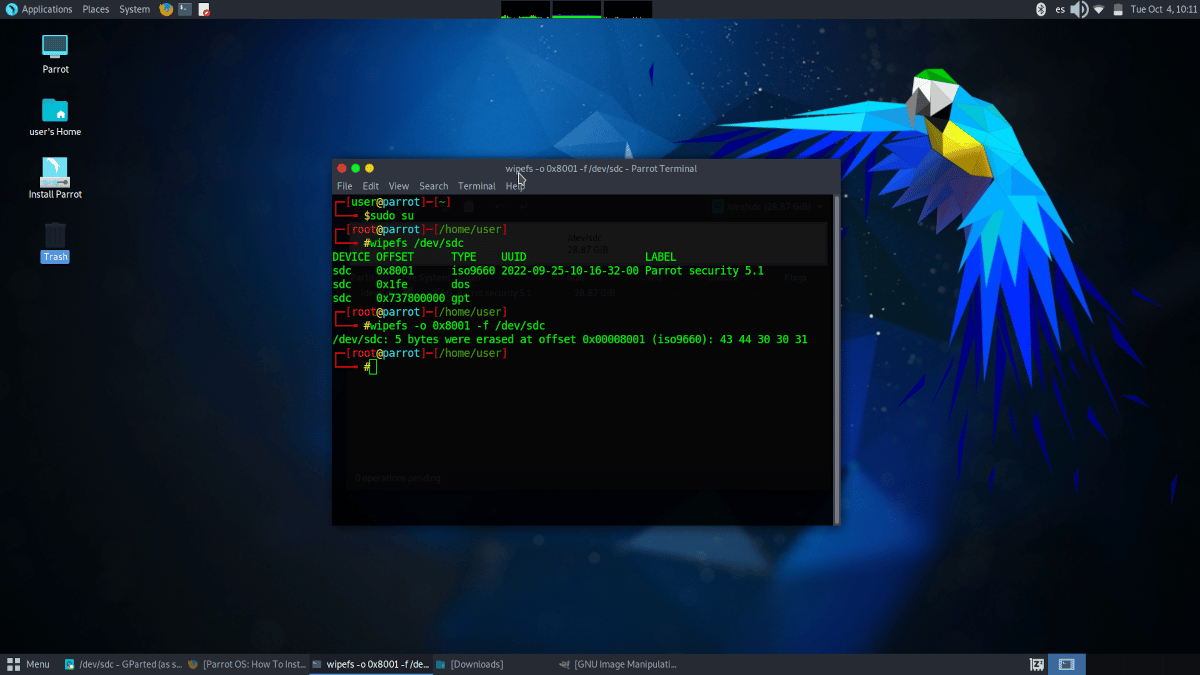
- We open a terminal and write sudo su to access as root user.
- Next we will write wipefs /dev/sdc, or whatever appeared in your GParted.
- We look at what appears under OFFSET.
- Now, in the terminal, we write wipefs -o 0x8001 -f /dev/sdc, keeping in mind that each one has to use whatever has appeared under its OFFSET and where the USB is mounted.
- This will have removed a few kbs and will allow us to continue with the process.
- We return to GParted and go to the GParted/Refresh menu (unless another language has been chosen before).
- We choose the partition that says “unallocated”, we right click, New.
- We leave everything as it is, except the label (Label), where we have to put “persistence” without the quotes, and click “Add” (add).

- We go to the Edit/Apply All Operations menu and accept the warning window (Apply).
- We look at where you have mounted the persistence drive, in my case /dev/sdc3.
- We return to the terminal and write mkdir -p /mnt/usb.
- Still in the terminal, we type mount /dev/sdc3 /mnt/usb. Note that “/dev/sdc3” must be the “persistence” partition that has been created in your case.
- Lastly, we write echo "/ union" > /mnt/usb/persistence.conf.
Entering the persistent version
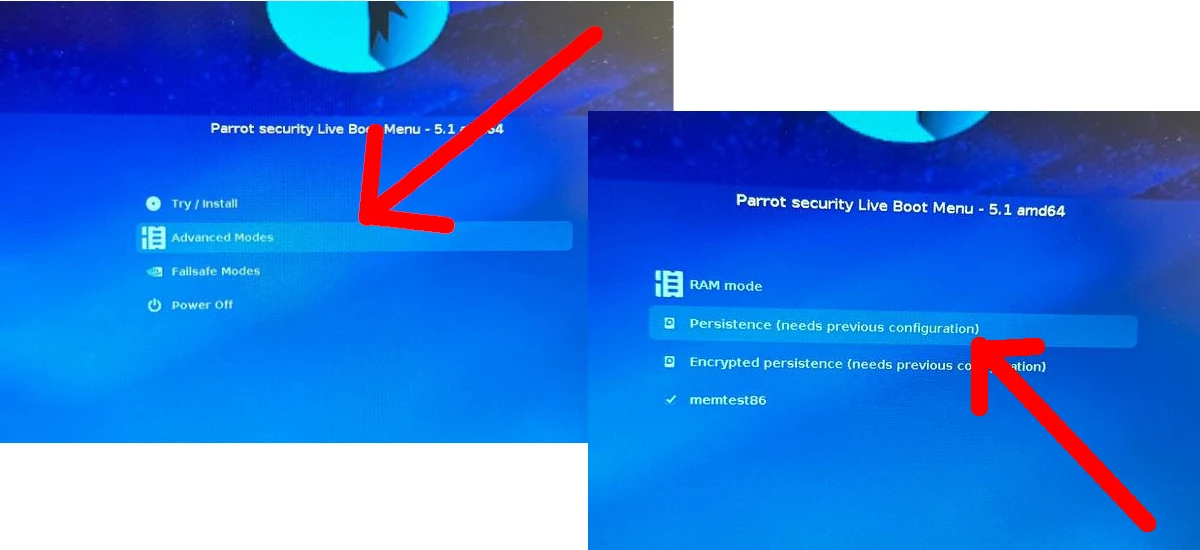
Now it would only be to enter the persistent version that we just created. To do this, we restart, re-enter the USB, go to Advanced Modes and choose Persistence, which in parentheses states that it first needs a configuration that is what we have explained above. If all went well, the changes will stick. To verify that it works, all you have to do is create a file or folder on the desktop, restart and see if it is there or not when you return. If it is, we have achieved it. If not, you will have to try again, because something has failed.
Although we will be using a "native" configuration to be able to use Parrot 5.x (or another compatible version) on a USB, we must be careful and know what we have in hand. Some update could cause something to stop working, so using such installations on a primary computer is not recommended. Yes, it can be used thinking that it is a Live USB, but knowing that the changes will be kept.