
Ubuntu 20.04 running on Hyper-V. It can be used in full screen but it is not possible to take screenshots.
Although installing a Linux distribution alongside or instead of Windows is fairly easy, It can be a bit complex for those who do it for the first time. They may also want to make sure before they take the leap.
In this post we are going to explain how to install linux on windows, We are going to do it focusing on Windows 10 although the way to do it is not very different in the new Windows 11.
How Linux is installed on Windows
There is a previous step that we cannot explain because it varies depending on the brand and model of the motherboard and the microprocessor. It is the way to activate the virtualization mode. But surely Google is the answer.
The instructions that follow refer to the most current versions of Windows 10. To check which version we have installed we can do it from the Command Prompt tool with the command winver
Hyper-V
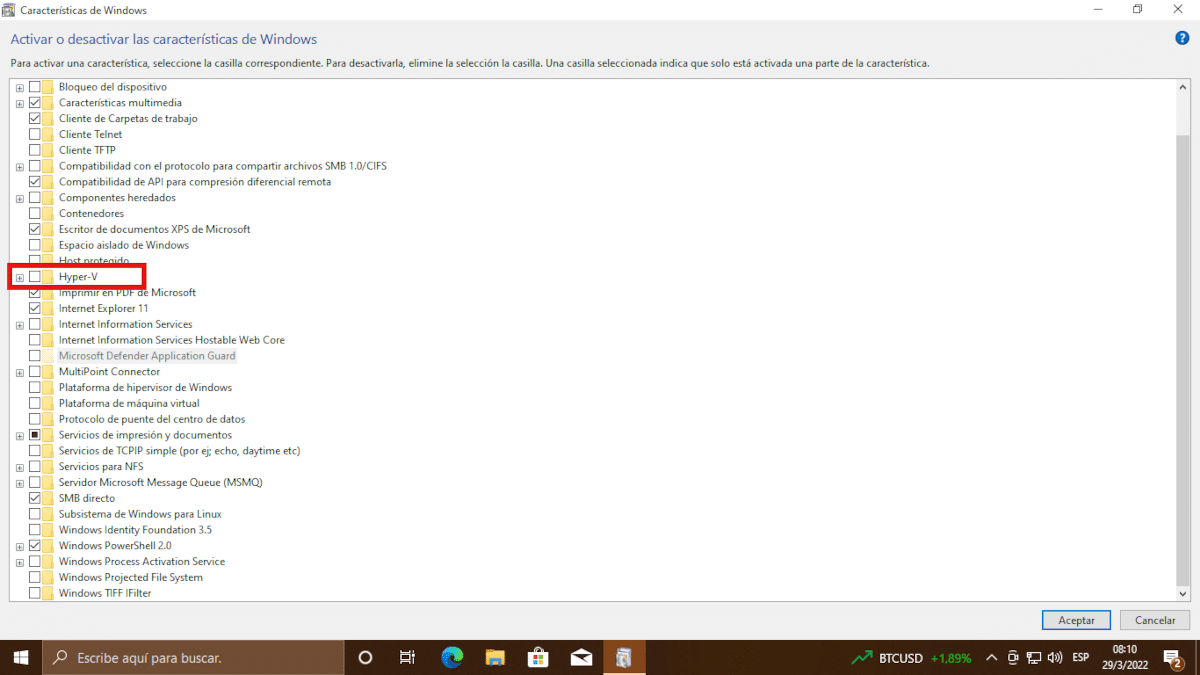
Hyper-V, Microsoft's virtual machine management tool is activated from Windows features
Let's start by defining some concepts
- Virtualization: It is the procedure of running an operating system on a computer whose characteristics are simulated by software, but which feels real to the operating system. Although some tools allow files to be exchanged between the virtualized operating system and the host, the former does not have access to the latter.
- Hypervisor: It is a program to create and run virtual machines. There are two kinds of them: those that run guest virtual machines directly on a system's hardware, fulfilling the role of an operating system, and those that behave just like traditional applications since they can be started and stopped like a normal program.
- Virtual machine: It is the emulated computer system that runs on top of another system. A virtual machine can access any number of resources limited only by the actual resources of the host computer.
Hyper-V is the built-in tool in Windows 10 and 11 which is responsible for creating and running virtual machines to which virtual devices such as disks and others can be added.
Software and hardware requirements to run Hyper-V
The supported versions of Windows are:
- 10 Windows Enterprise
- Windows 10 Pro
- Windows 10 Education
The minimum hardware requirements are:
- 64-bit processor with second level address translation (SLAT).
- CPU support for VM Monitor Mode Extension (VT-x on Intel CPUs).
- Memory of 4 GB or more to meet the minimum requirements of Windows and the virtualized operating system.
To verify the compatibility of the hardware we follow the following procedure:
- We wrote
cmd.exein the search bar. - we type
systeminfo - We seek the section Hyper-V Requirements.
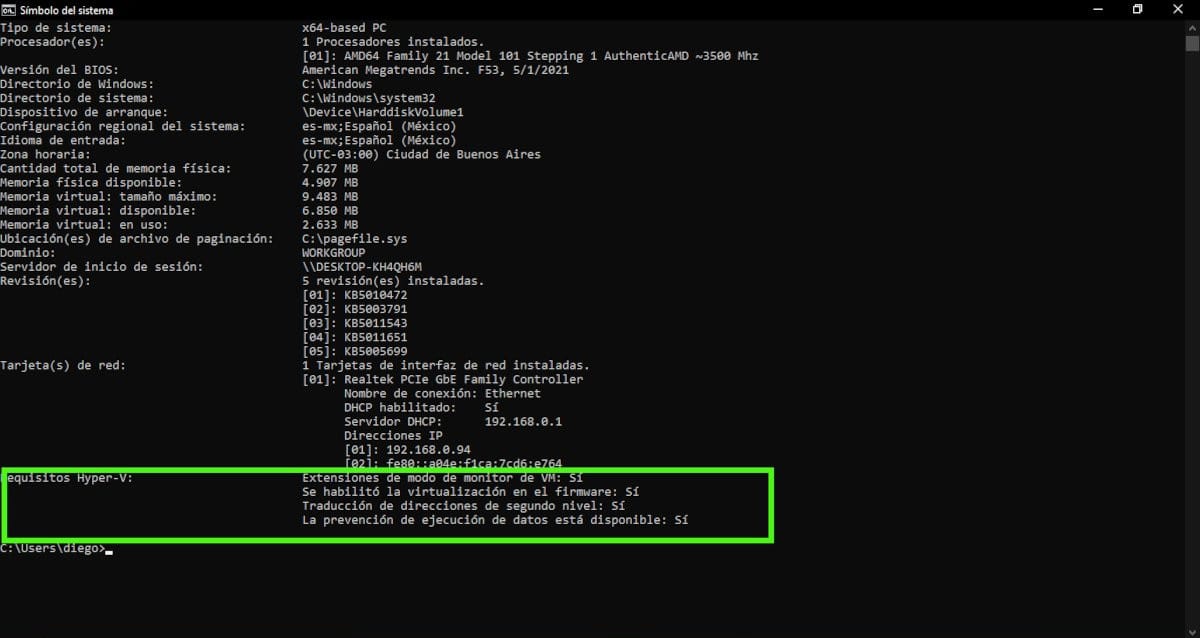
from the tool Symbol of the system we can check if our system meets the requirements to run Hyper-V
Once we confirm that all the requirements are met, we type in the search bar Aturn Windows features on or off. It also works to write Hyper-V.
As the name implies, Enable or disable Windows features does just that. We go down the list until we find the box corresponding to Hyper-V and click on OK. Once the activation is finished, we must restart the computer.
Creating virtual machines
Starting with version 1709 of Windows 10, also known as the Fall Creators Update, a virtual machine creator is included that does not require starting the administrator. We start it looking in the menu Quick build of Hyper-V.
The creator allows us to choose between some versions of Ubuntu or use images downloaded by us. Remember that the term image in this context refers to the exact replica of the downloaded file with respect to that of the origin server, and not to a graphic.
If we choose to use one of the images offered by Hyper-V, click on it and then Create virtual machine.
If let's use an image downloaded by us, click on Local installation source, We uncheck the box that indicates that Windows will run and click on Change the installation source. We can select files in .vmk or .iso format.
The use of the images that Hyper-V offers us does not mean much saving of time since you have to download and install it.
To eliminate the virtual machine we must use the following procedure:
- From the menu we start the Hyper-V Manager.
- We put the pointer on the virtual machine and with the right button we select Delete.
We confirm by clicking on Delete in the window that opens.
Windows Subsystem for Linux 2
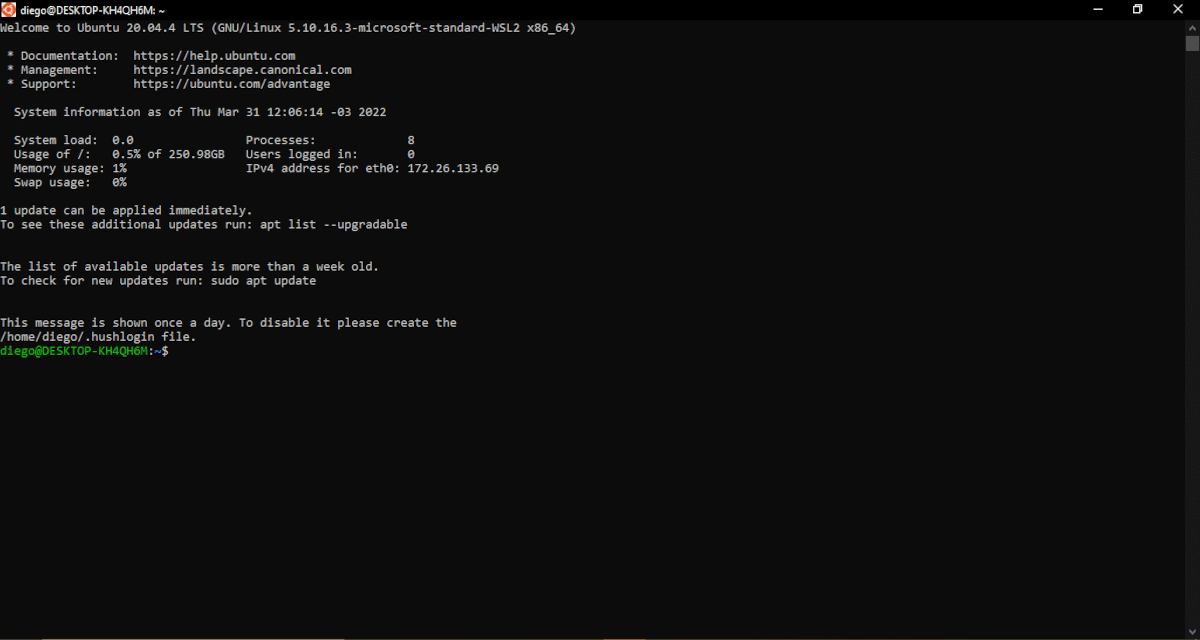
Ubuntu running on Windows Subsystem for Linux
Although it was created with developers in mind, Windows Subsystem for Linux (WSL) is a good option for new users to get familiar with using the Linux terminal. With WSL we can choose some of the most popular Linux distributions (without the desktop) and run most of the command line tools, utilities and applications that do not require a graphical interface directly in Windows and without having to install a virtual machine or install Linux on another partition or disk.
Some of its characteristics are:
- Choose from some of the most popular distributions Linux, different versions of Ubuntu, Debian, Fedora, openSUSE, Suse Linux among others are currently available. Some are free and others are paid.
- Run the most used toolcommand line s including grep, sed, awk or other ELF-64 binaries.
- Use Bash shell scripts and command line applications for Linux like vim, emacs and tmux.
- Write and run programs in programming languages like NodeJS, Javascript, Python, Ruby, C/C++, C# F#, Rust and Go among others.
- Interact with server technologies and databases such as SSHD, MySQL, Apache, lighttpd, MongoDB and PostgreSQL.
- Install programs from repositories of Linux distributions using their native package manager.
- Launch Windows applications from Linux.
Installing Windows Subsystem for Linux 2
The instructions below are for Windows 10 version 2004 and later (build 19041 and later) or Windows 11.
To install the Windows Subsystem for Linux we must follow the following procedure:
- We seek Symbol of the system on the menu.
- With the right button we select Execute as an administrator.
- We wrote
wsl --install.
In WSL 2 Microsoft made the installation much simpler and with this command the necessary optional components are enabled and the latest version of the Linux kernel is downloaded. Microsoft documentation indicates that Ubuntu is installed by default. However, in my case it didn't and it refers me to the app store.
We can install distributions in the following way:
wsl --list --online To view the list of available distributions
wsl --install -d <Nombre de la distribución> To install one of them.
In the Microsoft application store we have more options, you just have to search for them (We write Linux in the search engine) and install them normally. Then we launch it from the menu as if it were a normal application.
When we start a downloaded distribution for the first time, a terminal window will open and we will be asked to wait for the files to be uncompressed and stored on our computer. When this is finished we will have to create our user account.
If you are not familiar with Linux keep in mind that when you enter your username in the terminal you will not see the cursor move.
Exclusive features of Windows Subsystem for Linux in Windows 11
Installation and use of applications with a graphical interface
I said above that applications with a graphical interface could not be used. This refers to Windows 10 and what Microsoft officially reports in its documentation.
Official support for graphical interface applications is available for versions of Windows 11 Build 22000 or higher. As a previous step, the installation of specific drivers for WSL2 is required. Instructions are provided at this time for Intel, AMD y NVIDIA.
Installed applications will appear in the Windows menu below the distribution name.n and are installed with the commands set by the distributions themselves.
Mount disks in native Linux formats not recognized by Windows
Again another feature available for Windows 11 Build 22000 or higher. We follow the following procedure:
- We open PowerShell
- We wrote
GET-CimInstance -query "SELECT * from Win32_DiskDrive"
The identifier is found under the column DeviceID. We mount the disk with the command:
wsl --mount <DeviceID>
To mount a partition we type:
wsl –mount –bare
Then we open WSL and write;
lsblk
To mount the partition we write
wsl --mount <DeviceID> --partition <Número de partición> --type <Formato de archivo>
To account for
Virtualization and the use of Windows Subsystem for Linux they allow us to become familiar with a Linux environment, but not how it will work with our hardware. In any case, it is a very good first step if we want to go slowly. To have a better understanding of how our hardware interacts, we can install the Linux distribution on an external disk or on a flash drive that has sufficient capacity.
We can find more information about the tools mentioned in the article in the following links:
Official Hyper-V Documentation
Official Windows Subsystem for Linux 2 Documentation
Windows! Fo plague! hehe
and it will not be better to install it in a virtual machine
I mention alternatives. If I wanted to tell people what to do I would start a sect and collect tithes.