![]()
As you may already know, there are several types of virtualization, one of them is virtualization at the operating system level, and one of the projects that stands out the most in this regard is docker, along with other open-source projects such as OpenVZ, LXC / LXD, Linux-VServer, etc., or the proprietary Virtuozzo software. If you know this world or if you are a regular at this type of blog, you will already know about the project whose logo is a whale (hence the title for those who still do not know it), and above all you will have noticed how in recent years its presence in the media and interest has been increasing exponentially.
And it is that these new technologies are the present and the future, especially with the brutal growth of services in the cloud of which we have spoken so many times. Docker, among many other open source and free projects, are the ones that are allowing this expansion and great possibilities that we require from the cloud. But what is Docker? What is a container? How does it work?
Docker and containers:
Although the answer is somewhat more complex and I would need several of these articles, I will try to summarize it. However, if you need to know more about this fantastic project, there are very good books like Alberto González, current Red Hat Cloud Consultant. It is a practical guide that you can purchase at an affordable price both in Amazon as in agape. Well, with that said, let's get to know what Docker is.
We all know that The containers They have become a tool with a lot of potential in Linux, well, they can be implemented and managed thanks to Docker software. Containers are nothing more than isolated "boxes" with the essentials to be able to run a certain program or application. That can be understood as a light virtual machine, instead of the complete and heavy ones with which one works in full virtualization. This reduction translates into a lower overhead.
Containers add lightness, too portability, self-sufficiency, and flexibility highly coveted by developers. All thanks to LXC from our favorite kernel, Linux, and to the Docker project itself, with its containers, images and repositories. And it is these advantages that have brought success, which has been noted both by the involvement of some large companies in the sector such as Google, Red Hat, IBM and Microsoft, and by its implementation and good reception in large companies and cloud services that all we use it daily (AWS, Digital Ocean,…).
Install Docker step by step:
You have several alternatives to install Docker, from obtaining the tarball with the source code and compiling, to getting binaries from the different repositories and managing them with the package managers of your openSUSE distro, Ubuntu, Debian, CentOS, Fedora, etc. Perhaps with binary packages it is more comfortable, but in order not to lengthen the topic too much, I am going to present a more direct and universal method that works in any distribution:
sudo curl -fsSL https://get.docker.com/ | sh
As simple as that. Now we have the devil and the client, the latter will be the one that interacts with the Docker daemon and will allow us to do everything that this software offers. But there is still something to do, and that is to lift the service, that is, start the Docker daemon. For systemd you can do the following:
sudo systemctl enable docker

sudo systemctl start docker
If everything went well, will already be active all. You can check it with:
sudo systemctl status docker
We can start using it now ...
First steps: creating a container
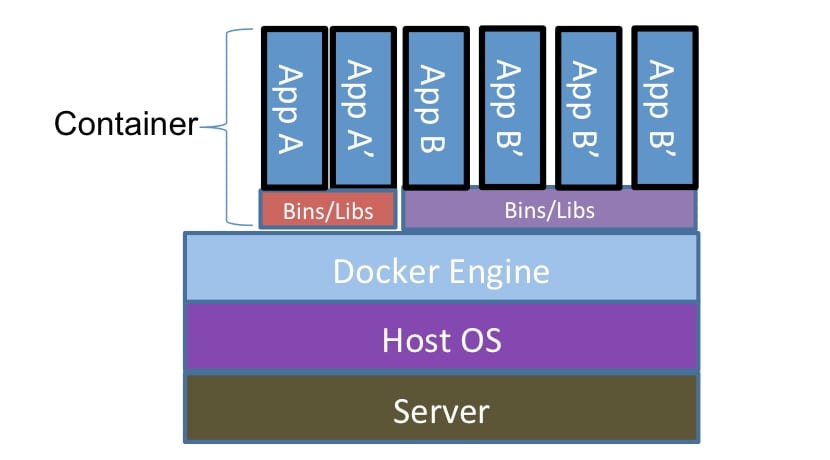
Well, as you already know, the container It is a package with everything necessary for one or more applications to run, that is, similar to a virtual machine, but lighter by depending on the host for execution. For the container to work, it must have the necessary libraries for execution, as well as certain dependencies, such as some operating system tools. Of course, another of the necessary parts is the runtime environment, that is, an execution environment such as interpreters for interpreted languages, JVM, files with code or binaries, etc.
There are some basic commands of Docker with which you will "move" within the environment, they are quite numerous, such as info, insert, kill, stop, start, build, ps, etc. In order to see them all and what each one is for, all you have to do is run:
docker
For more information you can consult the official documentation.
how can? create a container with Docker? Well, now we are going to give an example, we are going to create a container with Ubuntu and for this we use the run command, which allows both creating and executing containers (more information run -h):
docker run -i -t ubuntu /bin/echo Prueba contenedor
And that will use a local image if we already have it or, if it can't find it, it will download it. What's more will create the container, will allocate space for the new FS and mount it. Of course you will assign a network interface for guest / host communication. Once done, it will show us an echo with the phrase «Container test»That we have put.
You can see all images what do you have with:
docker images
Y for tear one, you can use the container ID with:
docker start -a <pon-la-ID-del-container>
To stop them, you can use stop instead of start:
docker stop <pon-la-ID-del-container>
And this is just the basics in Docker. I hope it has helped you to get started and take the first steps of many, since it can give you many possibilities. As you can see, it is a very broad topic and in which you can deepen starting with this tutorial or purchase additional books such as the one cited in the first paragraphs, which I recommend for its simplicity in practical explanations. Do not forget to leave your comments...
Interesting, I will look forward to the next articles, thanks