
In this post we will start by making a site with Bootstrap, the open source framework that makes it easy for us to make it responsive and provide it with some interactivity. It is a basic template automatically generated by a development environment plugin that we recommended before and that we will have to modify.
At previous article You will find the instructions to install VS Codium, translate its user interface to Spanish and install the Bootstrap plugin.
Two things to keep in mind:
- The commands we use are keyboard shortcuts, you have to type them. Copy/paste doesn't work.
- Our content manager does not allow me to display the HTML code so I have to use screenshots. So that you have access to the code of the examples I uploaded them to GitHub.
How to clone a GitHub repository
What separates the greats from the rest of us is the way they react to problems. Richard Stallman didn't like his printer driver and since they wouldn't let him change it he started the free software movement. Linus Torvalds was not convinced by any of the code sharing platforms and created his own. git.
Unlike traditional software distribution systems in which the only user interaction allowed is downloading, with Git you can follow the evolution of the project over time. Other people can clone the repository, make modifications, and propose that the original project's developers incorporate them. If accepted, developers can easily do so without having to download and re-upload the files.
There are several services based on Git, I chose GitHub simply because it integrates with VS Codium.
In order to download the sample files to your computer you just need to install the git package following your distribution's instructions for installing packages in the terminal.
Then you type the following commands.
I prefer to save the files in the Documents folder so I change the directory with
cd Documentos
Then I clone the files with:
git clone https://github.com/dggonzalez1971/bootstrap.git
I am going to remind you of these steps in each of the remaining articles, since in this way you will be updating the example files as they are uploaded.
To see the files just open the file explorer and look for the folder bootstrapping.
Making a site with Bootstrap
In case you prefer to type the code manually we start by creating a folder in which we will save the site. You can put whatever name you like.
Then we follow the next steps:
- Let's go to the menu Archive.
- Click on New Text File.
- Click on Save.
- We look for the folder we created and put the name of the file example1.html.
- Click on Save.
Sometimes the File Explorer window may be hidden by the VSCodium one.
Let's have the extension create the basic template for us. For this we type !b5-$
This will generate the code that you will find in the examples folder as example1.html
We will see the following:
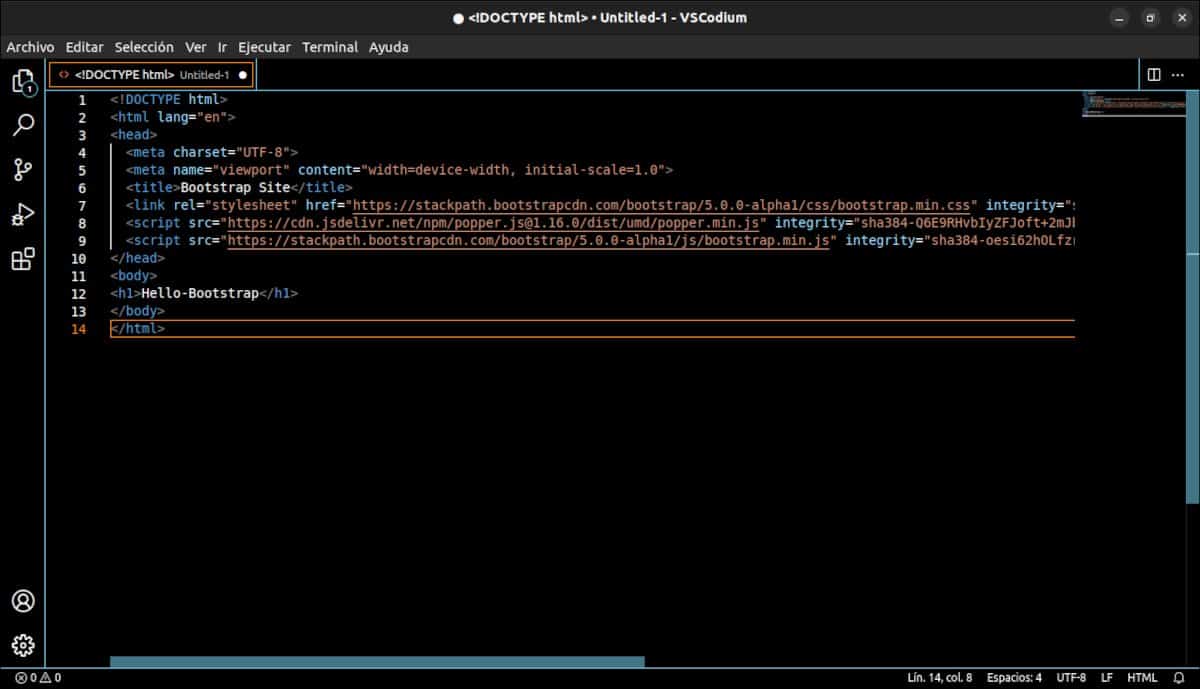
This is the code generated by the Bootstrap extension.
We are going to make some changes to this file. You will find the modifications under the name example2.html
- On line 2 we change the language by replacing eng with es. This indicates to search engines that the language of the site is Spanish.
- In line 6 we change the text that is under the labels title. We put My first Bootstrap site.
- In line 12 we change the content between the tags h1 by This is a site made with Bootstrap.
Next, we will make some important modifications. These modifications have to do with:
- The plugin developer cannot keep up with Bootstrap versions and there are more current ones.
- There are many options for bootstrap components and I am interested in another one.
- According to the official documentation, the calls to the Javascript libraries must be inside the body tags.
For example 2 we modified the content of line 7, deleted lines 8 and 9 and uploaded the remaining content to maintain numbering compatibility. Then we click on the end of line 10 to create a new line 11 and put the link to the Javascript libraries.
Don't worry if you don't understand the code. I will explain the function of each line in the next article.