
In this article We'll start by creating a Bootstrap development environment. As we explained in a previous article, Bootstrap is a framework that makes it easy for us to create sites that automatically adapt to any screen size.
Actually, no special tools are needed. You could easily write the code in the text editor on your desktop. Many even have support for HTML, CSS, and Javascript. But, integrated development environments include other tools that make it easy for you to write and proofread code.
Creating a Bootstrap Development Environment
For my taste, the best integrated development environment is Visual Studio Code. But, many Linux users don't like it because it sends telemetry to Microsoft. Nevertheless, There is an alternative that uses the VSCode source code called VSCodium that does not share data with anyone. That is the version which we will use from now on.
Installing VSCodium
We can install VSCodium in the following ways:
Snap Store
sudo snap install codium --classic
flat pack
flatpak install flathub com.vscodium.codium
Debian and derivatives
We got the verification keys
wget -qO - https://gitlab.com/paulcarroty/vscodium-deb-rpm-repo/raw/master/pub.gpg \

| gpg --dearmor \

| sudo dd of=/usr/share/keyrings/vscodium-archive-keyring.gpg
We add the repository
echo 'deb [ signed-by=/usr/share/keyrings/vscodium-archive-keyring.gpg ] https://download.vscodium.com/debs vscodium main' \
| sudo tee /etc/apt/sources.list.d/vscodium.list
We update and install
sudo apt update

sudo apt install codium
Fedora / RHEL / CentOS / Rocky Linux / OpenSUSE
We get the verification keys
sudo rpmkeys --import https://gitlab.com/paulcarroty/vscodium-deb-rpm-repo/-/raw/master/pub.gpg
We add the repositories
Fedora/RHEL/CentOS/RockyLinux: printf "[gitlab.com_paulcarroty_vscodium_repo]\nname=download.vscodium.com\nbaseurl=https://download.vscodium.com/rpms/\nenabled=1\ngpgcheck=1\nrepo_gpgcheck=1\ngpgkey=https://gitlab.com/paulcarroty/vscodium-deb-rpm-repo/-/raw/master/pub.gpg\nmetadata_expire=1h" | sudo tee -a /etc/yum.repos.d/vscodium.repo
OpenSUSE/SUSE: printf "[gitlab.com_paulcarroty_vscodium_repo]\nname=gitlab.com_paulcarroty_vscodium_repo\nbaseurl=https://download.vscodium.com/rpms/\nenabled=1\ngpgcheck=1\nrepo_gpgcheck=1\ngpgkey=https://gitlab.com/paulcarroty/vscodium-deb-rpm-repo/-/raw/master/pub.gpg\nmetadata_expire=1h" | sudo tee -a /etc/zypp/repos.d/vscodium.repo
To install we do:
Fedora/RHEL/CentOS/RockyLinux: sudo dnf install codium
OpenSUSE / SUSE: sudo zypper in codium
Arch Linux
We can use either of these two commands
sudo aura -A vscodium-bin
o
yay -S vscodium-bin
Parrot OS
sudo apt update

sudo apt install codium
Nix(OS)
nix-env -iA nixpkgs.vscodium
Configuring VSCodium
Depending on the installation mode, VSCodium may be in English. We can easily change this.
- In the Files menu click on Preferences.
- Click on Extension.
- We wrote spanish in the search engine.
- Click on the extension Spanish Language.
- We start the installation by clicking on Install.
- Click on Change Language and restart.
VSCode has a huge collection of extensions that facilitate programming in different languages, and we can also use them in VSCodium. Let's install the one we need:
- Click on Preferences.
- Click on Extensions.
- We wrote Bootstrap in the search engine.
- We select the one that says Bootstrap 5 & Font Awesome Snippets.
- Click on install
We will see the use of this extension when we start writing the site code. But, I have to make a clarification. For it to work you will have to type the commands. Copy and paste in this case does not work.
Getting Bootstrap
Bootstrap is basically a collection of components. When we write the code of a website based on Bootstrap the first thing we need to do is tell the browser where to find them.
To get Bootstrap there are two alternatives. The first is to download it from the web page and add it to the project files and the second is to put a link to the servers of the project itself. It can also be downloaded using some package managers (I mean those used by different programming languages, not those used by distributions) but, we'll leave that to the documentation.
Note that if you prefer to work with the Bootstrap files locally, you will need to upload them to the server with the rest of the website. If you link to the project's CDN server, it won't be necessary.
If you download the Bootstrap package you will see that there are two folders and a series of files. We are only interested in two. From the JS folder bootstrap.bundle.js and from the CSS folder bootstrap.css.
The code for both options is almost the same. Just change the location path.
Let's see an example
Using Bootstrap locally
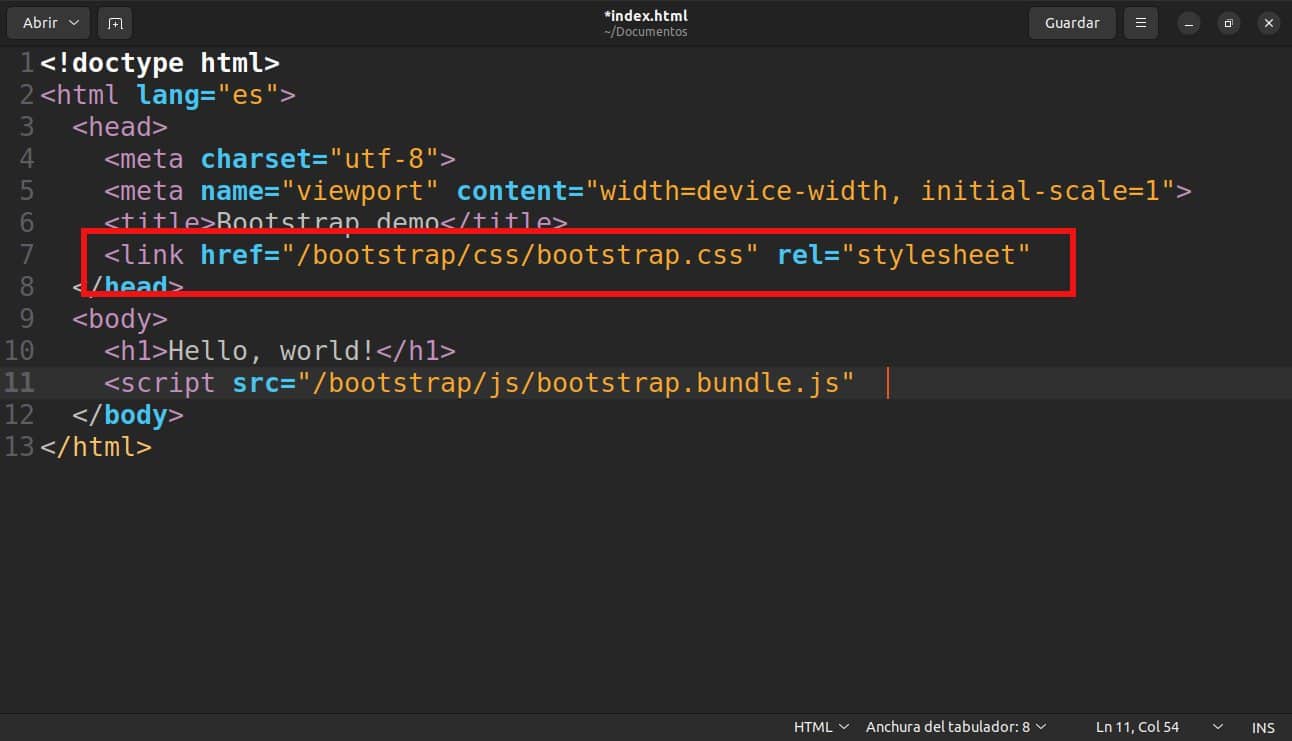
Calling Bootstrap components locally
Using from the project CDN
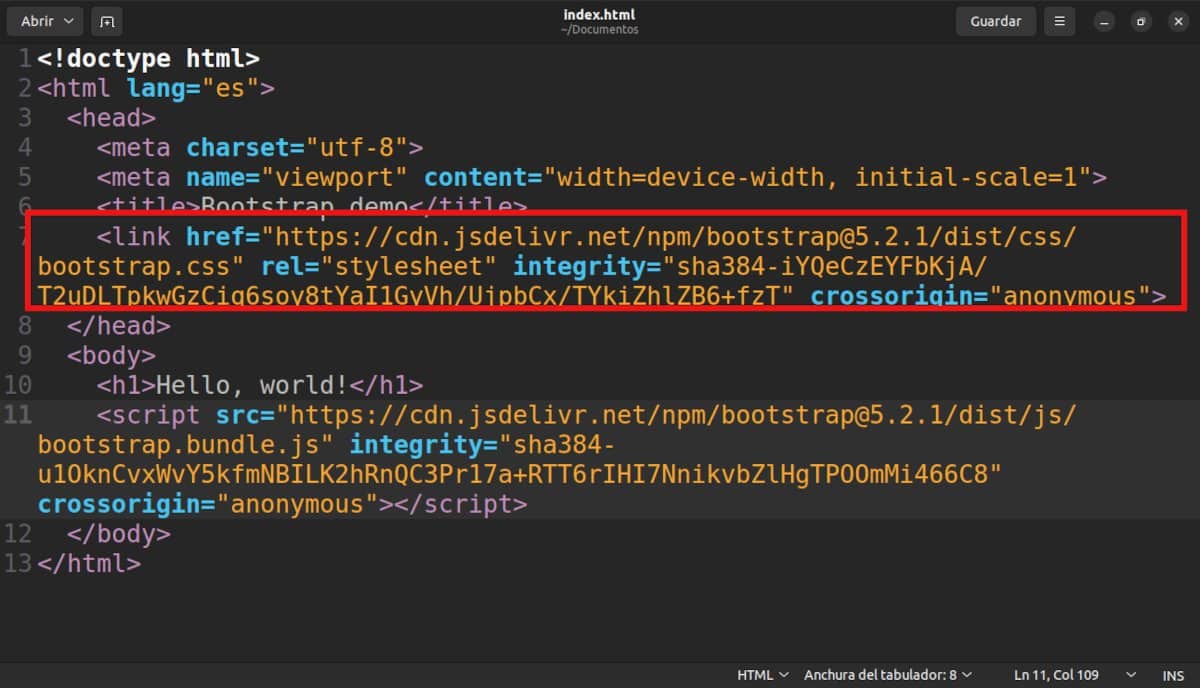
HTML code that loads Bootstrap components from a CDN
The location of the local file is arbitrary. I put them inside a folder called bootrap and created two subfolders called JS and CSS.
Don't worry if you didn't understand the rest of the code. We take care of that in the next article.
Note
After publishing the article I discovered that our content manager does not show the HTML code but the result. I will upload the examples to Github or similar and I will put screenshots here.
It is very advanced for me, but the tutorial is very much appreciated, someday it could help me, thanks
Hello rich. It seems very advanced, but it is not (at least not for practical purposes). You just have to have some clear concepts: web server, CDN, code editors, basic structure of a web page and little else.
I'm a web developer and I can tell you that Bootstrap is a great start. It should be learned by anyone who starts in web development.
Note. You should have basic knowledge of html css before you start with Bootstrap ;-)
What is the CDN server? the opposite of the local form?
Exact.
Instead of having the necessary files on the web itself, those of Bootstrap itself are used.