Although audio CDs are no longer as fashionable as they were a few years ago due to the digital industry that has burst into force, such as iTunes platforms, and especially the fantastic Spotify, but CDAs are still circulating and continue to be marketed. Therefore, if you have one of these discs and want to dump the content and do it in MP3 in an easy way, in this LxA article we explain how convert CDA to MP3 step by step.
The CDA was created by Philips and Sony in the 80s to store audio in a digital format versus earlier cassette tapes. It was a great success and has been preserved to this day, but the truth is that if we are going to move the music to an MP3 player or listen to it from a sound player in our distro, etc., usually it is not practical to use a CD due to the limited number of songs or simply because the native WAV format of these discs is not supported. That is why it is best to convert it to the most universal and lightweight format such as MP3.
The format WAV or WAVE It was an invention of Microsoft and IBM and is the native format that is usually used in this type of CD-As, allowing to store high-quality audio for professionals. The problem is that it consumes too much space, limiting the number of songs that can be stored on a CD. For example, for every minute of audio in WAV, about 10MB of space is consumed, which is nonsense compared to other formats. They are also limited to 6.6 hours in length, since WAV files larger than 4GB cannot be saved.
If we do the calculations, on a CD of about 750MB capacity and if we have an album with songs that last an average of 3 minutes each, we can store only about 20 or 25 songs, and that without counting the pauses between tracks that also occupy a few megabytes. Instead, with MP3 we have a very high quality with hardly any losses but we can have sizes up to 11 times smaller than WAV using 128bit / s. That means that the number of songs that can fit on a CD can go up to several hundred of them.
MP3 was developed in Germany by Karlheinz Brandenburg For the most part, he was the director of the Fraunhofer IIS Institute.To achieve these features, MP3 uses the lossy compression algorithm called MPEG-1 Audio Layer III or more modern MPEG-2 Audio Layer III, making it almost a standard for the audio industry and also for network streaming sound.
Extract CDA to MP3 using Asunder:

We are going to do it without using the console and commands, but from a simple graphical interface thanks to the Asunder program. With it you can rip the entire content or select only the tracks that you want to dump to your team. Another package that you must also have installed is lame, which will be used to encode the downloaded sound in the format we want, in this case MP3. For the installation of these packages, you can download it directly from the official website or use the repos of your distro to install it easily with the package managers ...
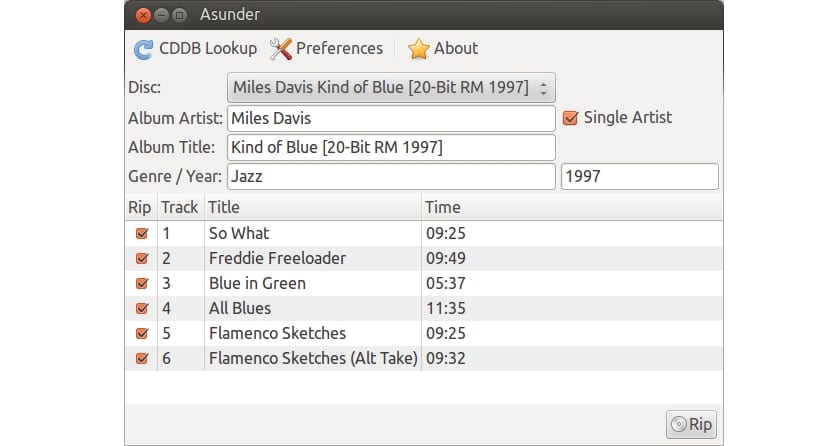
Once we have those packages installed, you can open Asunder, and with the inserted audio CD in the optical reader, you can select it from its main screen. If you go to preferences you can select several settings, such as the format you want the CDA to be transferred to, among the available OGG, MP3, and FLAC, etc. In our case we choose MP3, accept it and returning to the main screen we can search for CDDB and extract the tracks.
You can select them all or just the ones you want, and once you press the Extract button they will all be dumped and converted to the chosen format. By the way, in the interface you will see that other characteristics can be modified, such as the name of the tracks, date, title, etc. The truth is that it does not have too much mystery or complexity, but it is a topic that people ask a lot in forums and sites. The explanation is so simple that I think it is not worth saying more, anyway if you have doubts, leave your comments ...
Convert CDA to MP3 from the console:
But if you prefer to use the commands for a conversion more efficient, you could use some command line tools for it. If you remember, in the previous section I talked about a package called lame, well, if you have installed it, you can transform .wav to .mp3 in a simple way by executing the command:
lame canción.wav canción.mp3
But like this we go one by one, if what you prefer is to dump all the content of the CD and transform it into MP3 in a somewhat more automated way, we can install packages:
- id3 and id3v2: tag editors.
- lame: to create MP3 files as we have seen.
- cdparanoia: to extract tracks from CD
- cddiscid: for the database of the optical disk.
- abcde: an encoder for the CD.
Once we install those packages, we can create a script to automatically convert all audio tracks to MP3. Copy and paste the following code into your favorite text editor and save it as cda-to-mp3.sh:
<pre class="bbcode_code">#!/bin/bash
#Especificar el encoder para la conversión:
MP3ENCODERSYNTAX=lame

#Seleccionamos el path
LAME=lame

#Añadimos las opciones de lame necesarias:
LAMEOPTS='--preset extreme'

#Especificamos el formato de salida, en este caso MP3
OUTPUTTYPE="mp3"

#Seleccionamos el rippeador para extraer las pistas del CDA
CDROMREADERSYNTAX=cdparanoia

#Localización para el programa anterior y sus opciones:
CDPARANOIA=cdparanoia
CDPARANOIAOPTS="--never-skip=40"

#Programa de identificación del CD:
CDDISCID=cd-discid

#Localización de la base de datos (donde se almacenan):
OUTPUTDIR="$HOME/musica/"

#Damos formato a las etiquetas de las canciones:
OUTPUTFORMAT='${OUTPUT}/${ARTISTFILE}-${ALBUMFILE}/${TRACKNUM}.${TRACKFILE}'
VAOUTPUTFORMAT='${OUTPUT}/Various-${ALBUMFILE}/${TRACKNUM}.${ARTISTFILE}-${TRACKFILE}'

#Decidimos cómo van a ser etiquetadas:
ONETRACKOUTPUTFORMAT='${OUTPUT}/${ARTISTFILE}-${ALBUMFILE}/${ALBUMFILE}'
VAONETRACKOUTPUTFORMAT='${OUTPUT}/Various-${ALBUMFILE}/${ALBUMFILE}'

#Ponemos espacios en los nombres de las canciones:
mungefilename ()
{
  echo "$@" | sed s,:,-,g | tr / _ | tr -d \'\"\?\[:cntrl:\]
}

#Extra para mejorar el script como correr varios encoders a la vez, etc.
MAXPROCS=2
PADTRACKS=y
EXTRAVERBOSE=y

#Expulsa el CD una vez ha finalizado.
EJECTCD=y</pre>
To run it, with the CDA inserted in the drive, we just have to do the following:
chmod +x cda-to-mp3.sh

./cda-to-mp3.sh
Do not forget to leave your comments with doubts and suggestions ...
For lovers of sound, better FLAC the mp3 is dead!