
Generally when we start to have glitches in our system or we notice a certain slowness or freezing to the system, we usually attribute them to the system, that we have too many programs installed or too much information or the computer simply does not have enough resources.
To a large extent, these problems are usually caused by failures with the sectors of our disk Lasted. Checking the health of your hard drive is easy enough with the right tools.
That is why in this article let's talk about an excellent tool that will help us verify the health of our hard drive.
smartctl
Before we begin, many of you you will know that most modern hard drives have "SMART."
This is a feature that allows operating systems to (like Linux, Mac and Windows) verify the integrity and status of hard drives.
When the system tends to detect certain errors, it informs you and even many BIOSes tend to display the messages generated by failures with sectors on the hard disk.
Install Smartmontools
On Linux, there are many ways to check the status of a hard drive. However, probably the fastest way is with smartctl.
Before we can see how to use this tool, we must install it on our system in order to use it.
Smartctl is a utility found in almost all current Linux distributions within their repositories.
In order to install this utility in Debian, Ubuntu and systems based or derived from these, we must open a terminal and in it we are going to type the following command:
sudo apt-get install smartmontools
For those who are users of Arch Linux, Manjaro, Antergos or any derivative of it, we can install this utility with the following command:
sudo pacman -S smartmontools
While in the case of Fedora, CentOS, RHEL and systems derived from this we can install the application with the following command
sudo dnf instalar smartmontools
Finally, for those who are OpenSUSE users, they can install with this command:
sudo zypper instalar smartmontools
How to use Smartctl on Linux?
Smartctl is quite easy to use, since its use is only under the terminal and that it requires us to make use of the permissions of your user, we must open one and type in it:
su
Now done, this we must make a list of our hard drivesas well as partitions.
For this we must type the following command:
fdisk -l
It will give us a list of hard drives with their partitions and corresponding sizes and labels, starting with the disk and partition where we have the system installed.
Being this as / dev / sda and followed by the partition number which in this case will be 1.
If you have more than one partition on the same disk, it will continue to show / dev / sda2, / dev / sda3, and so on.
If you have more than one hard disk, it will change the last letter following the alphabet according to the number of disks, such is that the first is / dev / sda, the second / dev / sdb and so on.
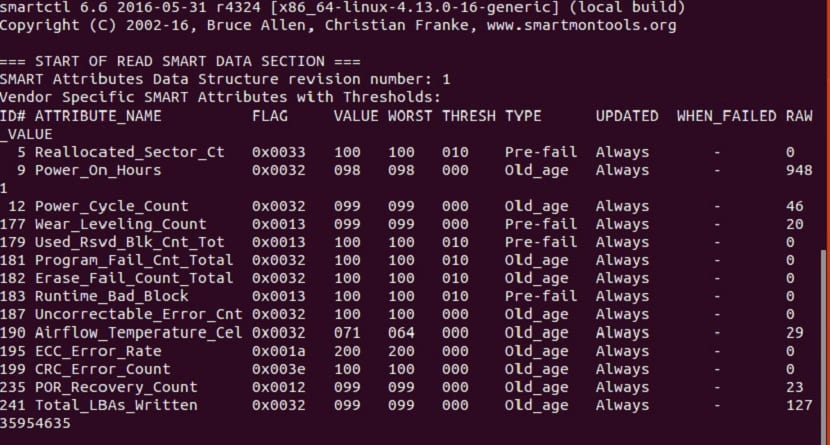
Once the disk has been identified, now we only execute the following command, replacing 'sdx' with the disk that you are going to examine:
smartctl -a / dev / sdX
If you require a report on the status of your disk, you can export it to a text document with the following command:
smartctl -a / dev / sdX >> /ruta/donde/guardara/el/reporte-de-disco.txt
This process can take a few minutes, since this depends largely on the storage capacity of your disk.
In case you need to take preventive actions with your disk you can use the fsck command.
Or in very extreme cases, require the help of the badblocks command, with which you can detect and isolate bad sectors on your hard drive.
Finally, if you require a tool that has a graphical interface, I can recommend the use of the Gnome disk utility or better known as Gnome disk.
Among its options you can find utilities to check the status of your disk.
Thanks, at least you mention the existence of a tool; it's already something. However, the output is not at all easy for a intermediate user to interpret. It would be good to come up with an explanation that is understandable to non-professionals of the most important results.