Well, you are going to laugh, but the first thing I have to say is that I would not do the first thing that I am going to explain in this article: how to change username in linux from the terminal. Changing the username consists of two phases, one in which we only change the name and the other in which we also change the UID or user identifier. The change will not be 100% correct if we do not carry out both processes.
Although everything that I will explain in this post is supposed to be safe, I am not a person who likes to insure things that you are not 100% sure of, so I would advise backup all important data before starting any process. On the other hand, I will also explain another way of doing it that seems safer to me. You have all the information below.
Change username with terminal
I am not a big fan of this method. It's a lot of steps and anything can go wrong, but this is supposed to be the correct way to change username in Linux. The steps would be the following:
- We change the name with the following command:
usermod -l nuevo-nombre viejo-nombre
From the above, the only thing we will do is change the username. If that is what you want, then you would already have it, but it would not be entirely true. The UID would remain the "old-name". So we continue.
- In the terminal, we write:
usermod -u UID username
The numeric value of the UID has to be integer and not negative. 0 to 99 are usually reserved for system accounts.
object lesson
But better with an example. We will follow these steps:
- We make a backup of everything important.
- We make sure that the user we want to change is not being used by any process.
- Now we have to see the user and their groups, in my case "pablinux". For this we would write "id pablinux" without the quotes.
- Next, we use the "grep" command to get information for the "pablinux" user from / etc / passwd. For this we will write "grep '^ pablinux:' / etc / passwd" without the quotes.
- The following is to view the user group information with these commands:
grep 'pablinux' /etc/group
groups pablinux
- We look for the directory permissions for the pablinux user, executing the command:
ls -ld /home/pablinux/
- Now we will see all the processes of the user and groups «pablinux» with these commands:
ps aux | grep pablinux
ps -u pablinux
Now we will change the user from pablinux to pablinux 2
- We use these commands
id pablinux
usermod -l pablinux2 pablinux
- We check it:
id pablinux
id pablinux2
ls -ld /home/pablinux
- We may see some errors if pablinux is using some processes. We have to kill them with these commands:
pkill -u pablinux pid
pkill -9 -u pablinux
usermod -l pablinux2 pablinux
Changing the name of the primary group from pablinux to pablinux2
- We wrote:
id pablinux
groupmod -n pablinux2 pablinux
id pablinux
ls -ld /home/pablinux
Changing home directory from pablinux to pablinux2
- We will write the following:
usermod -d /home/pablinux2 -m pablinux2
id pablinux2
ls -ld /home/pablinux2
Final step: change pablinux UID from 5001 to 1000
- We will write the following:
id pablinux
usermod -u 10000 pablinux
id pablinux
And, in theory, that would be it.
Play it safe: backup and recover files
Another thing we can do is create a new user and delete the old one. But for this we need a security partition or an external hard drive. The idea is the following:
- We copy our personal folder on the security partition or external disk. If we don't want to copy everything, we can copy only what we want. For example, if we press Ctrl + H, most Linux distributions will show hidden files. We can save the folders of Documents, Music, Images, etc, and also others such as .mozilla that will contain the Firefox configuration.
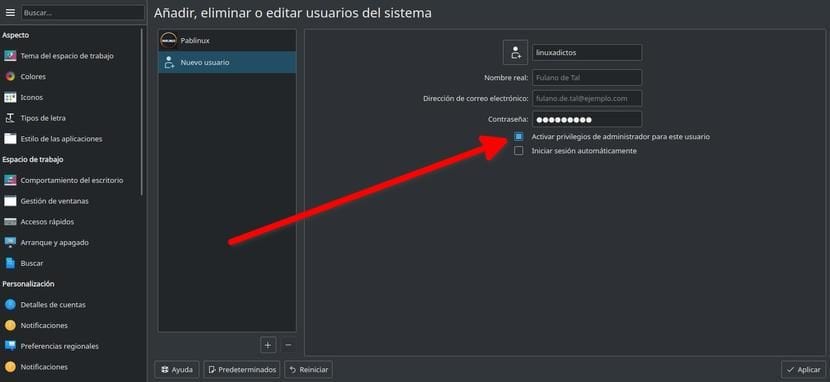
- Each Linux distribution has a different settings / preferences app, so I'll say it roughly (based on Kubuntu). We go to System Preferences / User Manager. Alternatively, we can search for "Users" in the settings of our operating system.
- Here we give the (+) or «New user».
- We put the new name and password.
- IMPORTANT: we give you administrator permissions.
- We start from the new account.
- We recover the data that we saved in step 1.
- WE CHECK that everything works correctly.
- If all goes well, we can delete our old account.
This is not a change to use, but it can serve us and it is a very safe system because we did not touch anything on the system and we had important data in a backup.
How about reinstalling the operating system?
Any user who has installed Linux himself will remember that there is a step in which we configure the username, computer name and password. That would be the important step. The only problem is that this system would take time. The steps to follow would be the following:
- We create a LiveCD or LiveUSB. To do this, we can continue this guide.
- We start the computer from the LiveUSB.
- We started the installation.
- In the section on what type of installation we want to carry out, we choose "Reinstall". It is important to note that this will reinstall the operating system and that many times you cannot reinstall the software that we had installed. Reinstalling the operating system should leave the / home folder untouched, which means reinstalling the programs will revert to the same settings.
- We continue the installation as always until we reach the section of choosing the username. Here we choose the new username.
- We wait for the installation to finish.
- When starting the operating system we will have our new username.
It seems important to me to explain that, like many computer processes, something might not turn out as expected, so the backup is very important. To ensure that our / home folder does not undergo any changes, it is worth having a partition dedicated to our personal folder. In this case, in the type of installation we want to carry out, we would choose «More» and here we would indicate which is the / home partition, we would mark it as such and we would not mark it for formatting. This is what I have been doing for over a decade and have NEVER lost any data.
As I said at the beginning of this article, I am more about doing it "hard". I have 1TB of hard disk + 128GB SSD where I install the operating system, so I have a partition with 500GB where I keep everything important. IN MY CASE, in case of any problem I decide to reinstall, sometimes from 0, and recover the data from the backup. What do you prefer to do?